7 posts tagged with "storage"

View All Tags

· 20 min read
Cooper Tseng

After enabling the Longhorn V2 Data Engine in Harvester, some nodes may report kernel workqueue lockups and become unstable. In severe cases, rke2-server may terminate, Longhorn may stop making progress, and the node may require recovery.

This issue is most likely to occur when SPDK is pinned to dedicated CPUs, but the Linux kernel is still allowed to run IRQ handlers or unbound workqueue workers on those same CPUs.

caution

The mitigation described in this article changes host CPU affinity for IRQs and kernel workqueues. These settings are node-wide and can affect every workload on the node. Apply the workaround only to nodes that run the Longhorn V2 Data Engine, and validate the CPU mask carefully before changing any host settings.

Affected Scenario

This issue can affect Harvester clusters that meet all of the following conditions:

  • The Longhorn V2 Data Engine is enabled.
  • The Longhorn V2 instance-manager pod runs SPDK (spdk_tgt), which busy-polls on the CPUs selected by the Longhorn V2 data engine CPU mask.
  • Host IRQ handling or unbound kernel workqueues are still allowed to run on the same busy CPUs used by spdk_tgt.

The default Longhorn V2 CPU mask is 0x3, which maps to CPUs 0 and 1. However, the issue is not limited to CPUs 0 and 1; it can occur with any CPU mask if kernel IRQs or unbound workqueues still run on the CPUs occupied by spdk_tgt.

The issue was observed on bare-metal Harvester nodes with Longhorn V2 enabled. It is not always reproducible in every environment.

Symptoms

Affected nodes may show one or more of the following symptoms:

  • Kernel logs repeatedly contain BUG: workqueue lockup.
  • The lockup is reported on a CPU that is part of the Longhorn V2 data engine CPU mask.
  • rke2-server becomes unstable or terminates without a clear user-visible reason.
  • Longhorn volumes, engines, replicas, or instance managers stop progressing.
  • User switching commands, such as sudo -i, may become very slow before the root shell appears.
  • The node becomes unstable or unhealthy.

Example kernel message:

Jul 27 07:27:55 hp-114-tink-system kernel: BUG: workqueue lockup - pool cpus=0 node=0 flags=0x0 nice=0 stuck for 2117s!
Jul 27 07:27:55 hp-114-tink-system kernel: Showing busy workqueues and worker pools:
Jul 27 07:27:55 hp-114-tink-system kernel: workqueue events: flags=0x0
Jul 27 07:27:55 hp-114-tink-system kernel: pwq 2: cpus=0 node=0 flags=0x0 nice=0 active=7 refcnt=8
Jul 27 07:27:55 hp-114-tink-system kernel: in-flight: 2935011:output_poll_execute ,32008:drm_fb_helper_damage_work drm_fb_helper_damage_work
Jul 27 07:27:55 hp-114-tink-system kernel: pending: vmstat_shepherd, switchdev_deferred_process_work, rht_deferred_worker, key_garbage_collector
Jul 27 07:27:55 hp-114-tink-system kernel: workqueue events_unbound: flags=0x2
Jul 27 07:27:55 hp-114-tink-system kernel: pwq 98: cpus=0-23 node=1 flags=0x4 nice=0 active=4 refcnt=8
Jul 27 07:27:55 hp-114-tink-system kernel: workqueue events_power_efficient: flags=0x80
Jul 27 07:27:55 hp-114-tink-system kernel: pwq 2: cpus=0 node=0 flags=0x0 nice=0 active=4 refcnt=5
Jul 27 07:27:55 hp-114-tink-system kernel: pending: neigh_managed_work, neigh_periodic_work, gc_worker [nf_conntrack], check_lifetime
Jul 27 07:27:55 hp-114-tink-system kernel: pool 2: cpus=0 node=0 flags=0x0 nice=0 hung=2117s workers=5 idle: 1025200 1541794
Jul 27 07:27:55 hp-114-tink-system kernel: task:kworker/0:0 state:R running task stack:0 pid:32008 tgid:32008 ppid:2 flags:0x00004000
Jul 27 07:27:55 hp-114-tink-system kernel: Workqueue: events drm_fb_helper_damage_work
Jul 27 07:28:12 hp-114-tink-system rke2[2909320]: time="2026-07-27T07:28:12Z" level=warning msg="Proxy error: write failed: write tcp 127.0.0.1:9345->127.0.0.1:46562: write: connection reset by peer"

Root Cause

Longhorn V2 uses SPDK. SPDK reactor threads are designed to busy-poll on the CPUs selected by the Longhorn V2 data engine CPU mask. This is expected for high-performance storage I/O.

The problem occurs when normal host kernel work is also allowed to run on those same CPUs. For example:

  • NIC or storage IRQs may still target the SPDK CPUs.
  • Unbound kernel workqueues may still include the SPDK CPUs in /sys/devices/virtual/workqueue/cpumask.
  • Per-workqueue CPU masks may still allow existing workers to run on the SPDK CPUs.

When SPDK fully occupies those CPUs, kernel workers can be delayed long enough for the kernel workqueue lockup detector to fire. Short or occasional workqueue lockup reports do not always mean the node is unrecoverable. The operational problem is when the delayed kernel work keeps accumulating and cascades into networking, RKE2, kubelet, and Longhorn instability.

For example, if the Longhorn V2 CPU mask is the default value 0x3, SPDK uses CPUs 0 and 1. IRQs and kernel workqueues should be moved away from CPUs 0 and 1.

Confirming the Issue

Run the following checks on each affected Harvester node.

1. Check Kernel Logs

journalctl -k --since "24 hours ago" | grep -E "BUG: workqueue lockup|soft lockup"

Look for the CPU reported in messages such as pool cpus=0, pool cpus=1, kworker/0, or kworker/1.

2. Check the Longhorn V2 CPU Mask

kubectl -n longhorn-system get settings.longhorn.io data-engine-cpu-mask -o jsonpath='{.value}{"\n"}'

The value may be data-engine-specific. For example:

{"v2":"0x3"}

Some Longhorn versions support CPU-list input for this setting. If the value is already a CPU list, use that list directly in the checks below.

Convert the mask to CPU IDs:

python3 - <<'PY'
mask = int("0x3", 0)
print(",".join(str(cpu) for cpu in range(mask.bit_length()) if mask & (1 << cpu)))
PY

For 0x3, the output is:

0,1

3. Check SPDK Placement

SPDK_PIDS=$(pgrep -f '[s]pdk_tgt' || true)

for pid in ${SPDK_PIDS}; do
ps -T -p "${pid}" -o pid,tid,psr,stat,pcpu,comm,args
done

This command matches the full command line because the SPDK process or its threads may appear as reactor_<cpu> in the kernel process name. In that case, pgrep -x spdk_tgt can return empty even when spdk_tgt is running.

Example output for the default CPU mask 0x3:

    PID     TID PSR STAT %CPU COMMAND         COMMAND
2913161 2913161 0 RLl 99.9 reactor_0 spdk_tgt -L all --mem-size 2048 -m 0x3
2913161 2913166 21 SLl 0.0 dpdk-intr spdk_tgt -L all --mem-size 2048 -m 0x3
2913161 2913220 1 RLl 99.9 reactor_1 spdk_tgt -L all --mem-size 2048 -m 0x3

The PSR column shows the CPU that each thread is running on. In the example above, reactor_0 is running on CPU 0 and reactor_1 is running on CPU 1, so the SPDK CPU list is 0,1.

To check whether running or blocked kernel workers are currently on the SPDK CPUs, use the following more targeted command. Replace SPDK_CPUS with the comma-separated CPU IDs from the reactor_* rows.

SPDK_CPUS="0,1"

ps -eLo pid,tid,psr,stat,pcpu,wchan:30,comm,args | \
awk -v cpus="${SPDK_CPUS}" '
BEGIN {
printf "%7s %7s %3s %-5s %5s %-30s %-16s %s\n", "PID", "TID", "PSR", "STAT", "%CPU", "WCHAN", "COMMAND", "ARGS"
split(cpus, cpu_list, ",")
for (i in cpu_list) {
spdk_cpu[cpu_list[i]] = 1
}
}
NR > 1 && spdk_cpu[$3] && $4 ~ /[RD]/ && ($7 ~ /^kworker\// || $7 ~ /^ksoftirqd\//) {
print
}
'

On nodes that are not affected, this command normally prints only the header line. If the header line is removed from the command, empty output is expected. This means there are no running or uninterruptible kworker/* or ksoftirqd/* threads on the SPDK CPUs at that moment.

Example output showing kernel work on an SPDK CPU:

    PID     TID PSR STAT   %CPU WCHAN                          COMMAND          ARGS
17 17 0 R 0.0 - ksoftirqd/0 [ksoftirqd/0]
32008 32008 0 R 0.0 - kworker/0:0+eve [kworker/0:0+events]
2935011 2935011 0 D 0.0 mgag200_ddc_algo_bit_data_pre_ kworker/0:2+eve [kworker/0:2+events]
4012518 4012518 0 R 0.0 - kworker/0:3+mm_ [kworker/0:3+mm_percpu_wq]

In this example, the PSR value is 0, and the process names are ksoftirqd/0 and kworker/0:*. This means kernel softirq and workqueue threads are running or blocked on CPU 0.

If the SPDK reactor threads are running on the CPUs reported in the workqueue lockup, or if the targeted command shows kworker/* or ksoftirqd/* activity on the SPDK CPUs, continue with the IRQ and workqueue checks.

4. Check IRQ Affinity

The following example checks CPUs 0 and 1 because the reactor_* rows above are running on those CPUs. Replace SPDK_CPUS with the CPU IDs used in your environment.

SPDK_CPUS="0,1"

cpu_list_overlaps() {
python3 - "$1" "$2" <<'PY'
import sys

target = {int(cpu) for cpu in sys.argv[1].split(",") if cpu}
seen = set()

for part in sys.argv[2].split(","):
part = part.strip()
if not part:
continue
if "-" in part:
start, end = map(int, part.split("-", 1))
seen.update(range(start, end + 1))
else:
seen.add(int(part))

sys.exit(0 if target & seen else 1)
PY
}

for irqdir in /proc/irq/[0-9]*; do
irq=${irqdir##*/}
eff=$(cat "${irqdir}/effective_affinity_list" 2>/dev/null || true)
conf=$(cat "${irqdir}/smp_affinity_list" 2>/dev/null || true)

if cpu_list_overlaps "${SPDK_CPUS}" "${eff}"; then
echo "IRQ=${irq} configured=${conf} effective=${eff}"
grep -w "^ *${irq}:" /proc/interrupts 2>/dev/null || true
fi
done

Example output:

IRQ=108 configured=0-5,12-17 effective=0
108: 25762242 0 ... IR-PCI-MSIX-0000:04:00.0 3-edge netboot-TxRx-3
IRQ=109 configured=0-5,12-17 effective=1
109: 0 15555565 ... IR-PCI-MSIX-0000:04:00.0 4-edge netboot-TxRx-4
IRQ=120 configured=0-5,12-17 effective=0
120: 10898692 0 ... IR-PCI-MSIX-0000:04:00.0 15-edge netboot-TxRx-15
IRQ=121 configured=0-5,12-17 effective=1
121: 0 8135324 ... IR-PCI-MSIX-0000:04:00.0 16-edge netboot-TxRx-16
IRQ=92 configured=0 effective=0
92: 2242087 0 ... IR-PCI-MSIX-0000:08:00.0 13-edge nvme0q13
IRQ=93 configured=1 effective=1
93: 0 448454 ... IR-PCI-MSIX-0000:08:00.0 14-edge nvme0q14

The effective value shows where the IRQ is actually running. In this example, NIC queues and NVMe queues are effectively landing on CPUs 0 and 1, which are the default SPDK reactor CPUs for mask 0x3. If device IRQs, especially high-traffic NIC or storage IRQs, are effectively landing on SPDK CPUs, the node is at risk.

5. Check Kernel Workqueue Masks

cat /sys/devices/virtual/workqueue/cpumask

for f in /sys/devices/virtual/workqueue/*/cpumask; do
echo "${f}: $(cat "${f}")"
done

Example output:

/sys/devices/virtual/workqueue/blkcg_punt_bio/cpumask: ffffff
/sys/devices/virtual/workqueue/ib-comp-unb-wq/cpumask: ffffff
/sys/devices/virtual/workqueue/iscsi_conn_cleanup/cpumask: ffffff
/sys/devices/virtual/workqueue/nvme-auth-wq/cpumask: ffffff
/sys/devices/virtual/workqueue/nvme-delete-wq/cpumask: ffffff
/sys/devices/virtual/workqueue/nvme-reset-wq/cpumask: ffffff
/sys/devices/virtual/workqueue/nvme-wq/cpumask: ffffff
/sys/devices/virtual/workqueue/scsi_tmf_0/cpumask: ffffff
/sys/devices/virtual/workqueue/writeback/cpumask: ffffff

On a 24-CPU node, ffffff means the workqueue can run on CPUs 0-23. If SPDK uses the default CPU mask 0x3, CPUs 0 and 1 are included in this workqueue mask. If the global or per-workqueue masks include the SPDK CPUs, unbound kernel work may still run on the SPDK CPUs.

Preferred Risk-Reduction Setting

Longhorn added the data-engine-cpu-isolation-enabled setting to reduce the chance of this issue. When enabled for the V2 Data Engine, the Longhorn V2 instance-manager:

  • Persists the SPDK CPU mask under /var/lib/longhorn/instance-manager/v2/spdk_cpu_mask on the host.
  • Programs /proc/irq/*/smp_affinity to the inverse of the SPDK CPU mask.
  • Writes the same inverse mask to /sys/devices/virtual/workqueue/cpumask.
  • Updates per-workqueue CPU masks when possible.
  • Reconciles stale affinity state on the next instance-manager restart if the setting is later disabled.

This setting steers IRQs and unbound workqueues away from SPDK CPUs. In some environments, this may stop the workqueue lockup messages entirely. In others, it may only reduce how often they occur because CPU-bound or per-CPU kernel workers such as kworker/0:* are tied to a specific CPU and cannot be moved by the unbound workqueue CPU mask.

Use this setting when the Longhorn version bundled with Harvester includes it. If the Longhorn setting exists but Harvester does not expose it in the UI, you can still configure it through the Longhorn setting resource. For Harvester versions earlier than v1.9.0, the bundled Longhorn version does not include the setting, so use the manual workaround in the next section.

caution

The Longhorn setting is a danger-zone setting. It changes host-wide IRQ and workqueue affinity, takes effect only after the V2 instance-manager pod is recreated, and Longhorn refuses to apply the change while V2 volumes are attached. Stop workloads that use Longhorn V2 volumes and detach those volumes before changing the setting.

If the setting exists in your Longhorn version, you can check it with:

kubectl -n longhorn-system get settings.longhorn.io data-engine-cpu-isolation-enabled

Enable it for the V2 Data Engine:

kubectl -n longhorn-system patch settings.longhorn.io data-engine-cpu-isolation-enabled \
--type=merge \
-p '{"value":"{\"v2\":\"true\"}"}'

Then wait for the V2 instance-manager pods to be recreated after all V2 volumes are detached.

Verify the instance-manager log:

kubectl -n longhorn-system logs <v2-instance-manager-pod> | \
grep -E "Setting IRQ affinity|Setting workqueue cpumask|Applied IRQ affinity|Applied global workqueue cpumask"

Example expected messages:

Setting IRQ affinity to exclude SPDK CPUs
Applied IRQ affinity mask
Setting workqueue cpumask to exclude SPDK CPUs
Applied global workqueue cpumask
Applied per-workqueue cpumask

Manual Workaround for Versions Without the Longhorn Setting

Use this workaround for Harvester versions earlier than v1.9.0, where the bundled Longhorn version does not include data-engine-cpu-isolation-enabled. For later versions, first check whether the Longhorn setting exists and prefer the setting-based risk-reduction path when possible.

The goal is to move IRQs and unbound workqueues away from the SPDK CPUs. For example, if SPDK uses the default CPUs 0 and 1, IRQs and unbound workqueues should use CPU 2 through the last online CPU.

This workaround is a risk-reduction step, not a guaranteed fix for every workqueue lockup. CPU-bound or per-CPU kernel workers can still run on the SPDK CPUs because they are tied to those CPUs by the kernel. The expected result is that the node remains stable and any remaining workqueue stalls recover quickly instead of hanging for a long time.

Repeat this workaround whenever the Longhorn V2 CPU mask changes. If CPU allocation is managed dynamically, the IRQ and workqueue masks must be recalculated after each placement change.

1. Identify the Non-SPDK CPUs and Mask

The default Longhorn V2 CPU mask is 0x3, so SPDK uses CPUs 0 and 1.

On the example node, all online CPUs are 0-23:

cat /sys/devices/system/cpu/online
0-23

Use the following values for this default example:

ItemValue
SPDK CPUs0,1
Non-SPDK CPU list2-23
Linux affinity maskfffffc

The Linux affinity mask is a CPU bitmap written in hexadecimal. CPU 0 is bit 0, CPU 1 is bit 1, and so on. On a 24-CPU node, all CPUs enabled is ffffff. Excluding CPUs 0 and 1 clears the lowest two bits, so the mask becomes fffffc. Leading zeros are optional, so fffffc and 00fffffc are equivalent.

Do not copy these values blindly if your Longhorn V2 CPU mask or online CPU list is different. The non-SPDK CPU list must be all online CPUs except the CPUs used by the SPDK reactor threads.

2. Apply IRQ Affinity at Runtime

Set NON_SPDK_AFFINITY_MASK to the Linux affinity mask from the previous step.

NON_SPDK_AFFINITY_MASK=fffffc

echo "${NON_SPDK_AFFINITY_MASK}" > /proc/irq/default_smp_affinity

for f in /proc/irq/[0-9]*/smp_affinity; do
echo "${NON_SPDK_AFFINITY_MASK}" > "${f}" 2>/dev/null || true
done

Some IRQs may reject affinity updates because they are managed by the kernel. This is expected. Always verify effective_affinity_list after applying the change.

Changing IRQ affinity alone may not make existing workqueue lockup messages disappear. Kernel workqueues can still run on the SPDK CPUs until the workqueue CPU masks are updated, and workers that are already stuck may continue to be reported by the kernel. Apply the workqueue affinity change as well, and then verify whether new lockup messages stop appearing.

These runtime IRQ affinity changes are not persistent across reboot. Use the persistence step later in this section if the runtime change mitigates the issue.

3. Apply Workqueue Affinity at Runtime

NON_SPDK_AFFINITY_MASK=fffffc

echo "${NON_SPDK_AFFINITY_MASK}" > /sys/devices/virtual/workqueue/cpumask

for f in /sys/devices/virtual/workqueue/*/cpumask; do
echo "${NON_SPDK_AFFINITY_MASK}" > "${f}" 2>/dev/null || true
done

These runtime workqueue affinity changes are not persistent across reboot. Use the persistence step later in this section if the runtime change mitigates the issue.

4. Restart the V2 Instance-Manager Pod

After changing both IRQ and workqueue affinity, restart the Longhorn V2 instance-manager pod on the affected node. This is required because the existing spdk_tgt process can keep the SPDK reactor threads on the busy CPUs, and already-stuck CPU-bound workers may continue to be reported by the kernel until spdk_tgt is recreated.

caution

Detach all Longhorn V2 volumes attached to the affected node before restarting the V2 instance-manager pod. You do not need to detach V2 volumes attached to other nodes. Restarting an instance-manager while V2 volumes are still attached to the affected node can interrupt storage I/O and affect running VMs.

Check the Longhorn V2 volumes first:

kubectl -n longhorn-system get volumes.longhorn.io \
-o custom-columns=NAME:.metadata.name,DATAENGINE:.spec.dataEngine,STATE:.status.state,NODE:.status.currentNodeID

Only continue after all v2 volumes whose NODE is the affected node are detached.

Find the V2 instance-manager pod on the affected node:

AFFECTED_NODE=hp-114-tink-system

kubectl -n longhorn-system get pods \
-l longhorn.io/component=instance-manager,longhorn.io/data-engine=v2 \
--field-selector spec.nodeName="${AFFECTED_NODE}" \
-o custom-columns=NAME:.metadata.name,NODE:.spec.nodeName

Restart the V2 instance-manager pod:

V2_IM_POD=<v2-instance-manager-pod-name>

kubectl -n longhorn-system delete pod "${V2_IM_POD}"

5. Make IRQ and Workqueue Affinity Persistent

The previous IRQ and workqueue affinity commands only change runtime procfs and sysfs state, so they are lost after reboot. If those runtime changes reduce or stop new lockup messages, use a Harvester CloudInit resource to reapply both IRQ and workqueue affinity after reboot. This follows the same model as the Longhorn CPU isolation setting, which updates host IRQ and workqueue affinity at runtime.

The following manifest is a Harvester CloudInit resource, not a file that you manually place on each node. Save it on a machine with kubectl access to the Harvester cluster and apply it with kubectl apply -f <file-name>.yaml. The Harvester controller writes the content to /oem/99_longhorn_v2_cpu_affinity.yaml on each node matched by matchSelector.

You can add this resource after the cluster is already installed. The file is synchronized to the matched nodes after the resource is applied, but the cloud-init commands take effect only after those nodes are rebooted. After reboot, the commands are applied again on each boot.

Example CloudInit resource for the default SPDK CPUs 0 and 1 on a 24-CPU node:

apiVersion: node.harvesterhci.io/v1beta1
kind: CloudInit
metadata:
name: longhorn-v2-cpu-affinity
spec:
matchSelector:
kubernetes.io/hostname: "hp-114-tink-system"
filename: 99_longhorn_v2_cpu_affinity.yaml
contents: |
stages:
network:
- commands:
- echo fffffc > /proc/irq/default_smp_affinity
- for f in /proc/irq/[0-9]*/smp_affinity; do echo fffffc > "${f}" 2>/dev/null || true; done
- echo fffffc > /sys/devices/virtual/workqueue/cpumask
- for f in /sys/devices/virtual/workqueue/*/cpumask; do echo fffffc > "${f}" 2>/dev/null || true; done

Adjust the affinity mask and matchSelector for your environment. To target a different affected node, replace hp-114-tink-system with that node's kubernetes.io/hostname label value. Do not use matchSelector: {} unless every node should receive this workaround. This workaround is not dynamically reconciled. If the Longhorn V2 CPU mask changes, update the CloudInit resource and reboot the affected nodes.

After configuring the CloudInit resource, reboot the affected nodes for the commands to take effect. To apply the workaround immediately before reboot, run the runtime commands in the previous steps.

If Lockups Still Appear

The IRQ and workqueue affinity changes reduce the chance of a workqueue lockup, but they may not eliminate it in every environment. The workqueue CPU mask mainly controls unbound workqueues. Bound or per-CPU workqueues can still run on their associated CPU, so kernel workers such as kworker/20:* may still appear on an SPDK CPU even after unbound workqueues are moved away.

If the node still reports occasional workqueue lockups after the IRQ and workqueue affinity mitigation is applied, use the following additional mitigations.

1. Change the Longhorn V2 Disk Driver to auto

If the affected Longhorn V2 disk is using the aio disk driver, consider changing the requested disk driver to auto. For an NVMe disk, verify after reprovisioning that Longhorn reports the actual disk driver as nvme in the Longhorn Node custom resource. In recent validation, after applying IRQ affinity and confirming that the actual disk driver was nvme, no new workqueue lockup messages were observed during the test window.

caution

Only use the SPDK NVMe disk driver when the NVMe device satisfies the Longhorn V2 IOMMU group isolation requirement. Longhorn uses vfio-pci for the SPDK NVMe path, and VFIO must claim the whole IOMMU group. If the NVMe device shares an IOMMU group with a PCIe bridge or another device that cannot be bound to VFIO, Longhorn cannot use the SPDK NVMe driver for that disk and the disk must stay on the aio driver. For details, see the Longhorn V2 Data Engine requirements.

Before changing the disk driver, remove the affected disk from Harvester. Follow the Remove Disks guide, and make sure the disk no longer contains active Longhorn replicas or backing images.

Find the BlockDevice resource for the disk:

kubectl -n longhorn-system get blockdevices.harvesterhci.io \
-o custom-columns=NAME:.metadata.name,NODE:.spec.nodeName,PROVISION:.spec.provision,PHASE:.status.provisionPhase,STATE:.status.state,ENGINE:.spec.provisioner.longhorn.engineVersion,DRIVER:.spec.provisioner.longhorn.diskDriver

After the disk is removed and the BlockDevice is no longer provisioned, patch the disk driver:

BLOCKDEVICE=<blockdevice-name>

kubectl -n longhorn-system patch blockdevice.harvesterhci.io "${BLOCKDEVICE}" \
--type=merge \
-p '{"spec":{"provisioner":{"longhorn":{"engineVersion":"LonghornV2","diskDriver":"auto"}}}}'

Provision the disk again from the Harvester UI. Harvester will add the disk back to Longhorn V2. Then verify the requested driver in the BlockDevice resource and the actual driver in the Longhorn Node resource.

Verify the BlockDevice after provisioning:

kubectl -n longhorn-system get blockdevice.harvesterhci.io "${BLOCKDEVICE}" -o yaml

The matching BlockDevice should show:

spec:
provision: true
provisioner:
longhorn:
engineVersion: LonghornV2
diskDriver: auto
status:
provisionPhase: Provisioned
state: Active

Also check the Longhorn Node custom resource to confirm the actual disk driver selected by Longhorn:

kubectl -n longhorn-system get nodes.longhorn.io \
-o go-template='{{printf "NODE\tDISK\tTYPE\tPATH\tSPEC_DRIVER\tSTATUS_DRIVER\n"}}{{range .items}}{{ $node := . }}{{range $diskName, $disk := .spec.disks}}{{ $status := index $node.status.diskStatus $diskName }}{{printf "%s\t%s\t%s\t%s\t%s\t%s\n" $node.metadata.name $diskName $disk.diskType $disk.path $disk.diskDriver $status.diskDriver}}{{end}}{{end}}'

For the affected disk, SPEC_DRIVER should be auto, and STATUS_DRIVER should be nvme:

NODE                  DISK                                  TYPE    PATH          SPEC_DRIVER   STATUS_DRIVER
hp-161-tink-system 32f43222-1eb1-4ab6-9e65-c4f8ddad700d block 0000:08:00.0 auto nvme

The spec.disks.<blockdevice-name>.diskDriver value is the requested driver mode from Harvester. The status.diskStatus.<blockdevice-name>.diskDriver value is the driver Longhorn actually uses. For an NVMe disk, the status value should be nvme.

2. Enable Longhorn V2 Interrupt Mode

If the lockup still occurs after changing the disk driver and applying IRQ affinity, consider enabling Longhorn V2 interrupt mode.

caution

Longhorn V2 interrupt mode should still be treated as experimental. It changes the SPDK execution model from continuous polling to interrupt-driven handling, which can reduce constant CPU pressure but may affect latency and performance. Longhorn also requires all V2 volumes to be detached before this setting can be changed.

Check the setting:

kubectl -n longhorn-system get settings.longhorn.io data-engine-interrupt-mode-enabled

Enable interrupt mode for the V2 Data Engine:

kubectl -n longhorn-system patch settings.longhorn.io data-engine-interrupt-mode-enabled \
--type=merge \
-p '{"value":"{\"v2\":\"true\"}"}'

Wait for the V2 instance-manager pods to be recreated after all V2 volumes are detached.

Verification

After applying the mitigation, verify the items that directly confirm the node recovered and the settings are still applied.

  1. Kernel logs no longer report new workqueue lockups, or any remaining reports are short and do not keep increasing for a long time.

    journalctl -k --since "30 minutes ago" | grep -E "BUG: workqueue lockup|soft lockup" || true

    If occasional messages still appear, compare the stuck for <seconds>s value over time. The mitigation is still useful if the stuck time stops growing, the node remains responsive, and RKE2, kubelet, and Longhorn keep making progress.

  2. The Longhorn V2 instance-manager pod is running on the affected node.

    AFFECTED_NODE=hp-114-tink-system

    kubectl -n longhorn-system get pods \
    -l longhorn.io/component=instance-manager,longhorn.io/data-engine=v2 \
    --field-selector spec.nodeName="${AFFECTED_NODE}"
  3. If you configured the persistent workaround and rebooted the node, the IRQ and workqueue masks are still applied.

    cat /proc/irq/default_smp_affinity
    cat /sys/devices/virtual/workqueue/cpumask

References

· 11 min read
Cooper Tseng

When working with Longhorn, you may encounter two different VolumeAttachment resources with similar names: Kubernetes VolumeAttachment (storage.k8s.io/v1) and Longhorn VolumeAttachment (longhorn.io/v1beta2). This often causes confusion about why both exist, when each is created, whether they always appear together, and which one to check when troubleshooting. This document clarifies their distinct roles, shows how they work together (and when they don't), and provides real-world examples to help you identify attachment sources and effectively troubleshoot volume attachment issues.

For additional context, see the official documentation at https://longhorn.io/docs/latest/advanced-resources/volumeattachment/

note

The observations and analysis in this document are based on Longhorn latest 1.10.x branch.


Workflow: How K8s and Longhorn VolumeAttachments Work Together

When a Pod requires a Longhorn volume, two separate VolumeAttachment resources work together to complete the attachment process. The Kubernetes VolumeAttachment represents the CSI standard attachment request, while the Longhorn VolumeAttachment manages the actual attachment orchestration with ticket-based coordination.

The following diagram illustrates the complete flow from Pod scheduling to successful volume attachment:

┌─────────────────────────────────────────────────────────────┐
│ Pod Scheduled to Node │
└─────────────────────┬───────────────────────────────────────┘


┌─────────────────────────────────────────────────────────────┐
│ Kubernetes Attach/Detach Controller │
│ Creates K8s VolumeAttachment │
│ APIVersion: storage.k8s.io/v1 │
│ Spec: │
│ Attacher: driver.longhorn.io │
│ NodeName: worker-node-1 │
│ Source.PersistentVolumeName: pvc-xxx │
└─────────────────────┬───────────────────────────────────────┘


┌─────────────────────────────────────────────────────────────┐
│ CSI External-Attacher (Longhorn) │
│ Watches K8s VolumeAttachment │
└─────────────────────┬───────────────────────────────────────┘


┌─────────────────────────────────────────────────────────────┐
│ Longhorn CSI Plugin │
│ Calls ControllerPublishVolume() │
└─────────────────────┬───────────────────────────────────────┘


┌─────────────────────────────────────────────────────────────┐
│ Longhorn Manager API │
│ Creates/Updates Longhorn VolumeAttachment │
│ APIVersion: longhorn.io/v1beta2 │
│ Spec: │
│ Volume: my-volume │
│ AttachmentTickets: │
│ csi-attacher-<hash>: │
│ ID: <pod-id> │
│ Type: csi-attacher │
│ NodeID: worker-node-1 │
│ Parameters: {...} │
└─────────────────────┬───────────────────────────────────────┘


┌─────────────────────────────────────────────────────────────┐
│ Longhorn VolumeAttachment Controller │
│ 1. Evaluates all attachment tickets │
│ 2. Selects appropriate ticket to satisfy │
│ 3. Updates Volume.Spec.NodeID = worker-node-1 │
└─────────────────────┬───────────────────────────────────────┘


┌─────────────────────────────────────────────────────────────┐
│ Longhorn Volume Controller │
│ Performs actual volume attachment operation │
└─────────────────────┬───────────────────────────────────────┘


┌─────────────────────────────────────────────────────────────┐
│ Longhorn VolumeAttachment Controller │
│ Updates ticket status: Satisfied = true │
└─────────────────────┬───────────────────────────────────────┘


┌─────────────────────────────────────────────────────────────┐
│ Longhorn CSI Plugin │
│ Returns attach success to external-attacher │
└─────────────────────┬───────────────────────────────────────┘


┌─────────────────────────────────────────────────────────────┐
│ CSI External-Attacher │
│ Updates K8s VolumeAttachment.Status.Attached = true │
└─────────────────────────────────────────────────────────────┘

The resulting Longhorn VolumeAttachment YAML:

apiVersion: longhorn.io/v1beta2
kind: VolumeAttachment
metadata:
name: pvc-0b9c8d59-0ae8-413c-8bc5-af32b932b8ab
namespace: longhorn-system
labels:
longhornvolume: pvc-0b9c8d59-0ae8-413c-8bc5-af32b932b8ab
spec:
volume: pvc-0b9c8d59-0ae8-413c-8bc5-af32b932b8ab
attachmentTickets:
# This CSI ticket was triggered by K8s VolumeAttachment (Pod binding)
csi-3d3120f43480db87c91a6902d670c35899917c03f9f6f81db7bf26d9d66e45ec:
id: csi-3d3120f43480db87c91a6902d670c35899917c03f9f6f81db7bf26d9d66e45ec
type: csi-attacher
nodeID: harvester-node-1
parameters:
disableFrontend: "false"
status:
attachmentTicketStatuses:
csi-3d3120f43480db87c91a6902d670c35899917c03f9f6f81db7bf26d9d66e45ec:
id: csi-3d3120f43480db87c91a6902d670c35899917c03f9f6f81db7bf26d9d66e45ec
satisfied: true # Volume successfully attached
conditions:
- type: Satisfied
status: "True"

Notice the csi-attacher ticket type - this confirms the attachment was triggered by Kubernetes VolumeAttachment through the CSI flow, not by Longhorn internal operations.

Trigger Points

Understanding when each VolumeAttachment is created or modified is crucial for troubleshooting attachment issues:

  1. K8s VolumeAttachment Creation: Triggered when Pod is scheduled to a node requiring a PVC

    • Managed by Kubernetes Attach/Detach (AD) Controller
    • One VolumeAttachment per PV-node combination
    • Represents Kubernetes' intent to attach the volume
  2. Longhorn VolumeAttachment Ticket Addition: Triggered by various Longhorn components based on operation needs:

    • CSIAttacher - when CSI ControllerPublishVolume is called
    • SnapshotController - when creating snapshots of volumes
    • BackupController - when backing up volumes
    • LonghornAPI - when users manually attach volumes via Longhorn UI
    • VolumeCloneController - when managing source volume during clone
    • VolumeRestoreController - when restoring data from backups
    • VolumeExpansionController - when expanding volume size
    • ShareManagerController - for RWX volume sharing
    • SalvageController - for volume salvage operations

Attachment Ticket Priority and Coordination

When multiple operations require volume attachment simultaneously, Longhorn uses a ticket-based priority system to coordinate access intelligently. This ensures critical operations take precedence while allowing background tasks to coexist when possible.

How Priority Works

Each ticket type has an assigned priority level that determines selection order when the volume is detached:

  • Priority 2000 (Highest):
    • VolumeRestoreController
    • VolumeExpansionController
  • Priority 1000:
    • LonghornAPI
  • Priority 900:
    • CSIAttacher
    • ShareManagerController
    • SalvageController
  • Priority 800 (Lowest):
    • BackupController
    • SnapshotController
    • VolumeCloneController
    • VolumeEvictionController

When the volume is detached, the ticket with the highest priority is selected for attachment. If multiple tickets share the same priority, the first one (sorted by ID) is chosen.

note

For ReadWriteMany (RWX) Filesystem mode volumes, CSIAttacher tickets are ignored during ticket selection and detachment decisions. Only the ShareManagerController ticket is considered, as it manages the centralized sharing mechanism for RWX access. Individual CSI attacher tickets from Pods are summarized and handled by the Share Manager, not directly by the VolumeAttachment Controller.

Interruption Mechanism

Priority levels alone don't tell the complete story. Longhorn also implements an interruption mechanism to handle cases where request arrives while the volume is already attached to a different node.

Interruptible operations (can be interrupted):

  • BackupController
  • SnapshotController
  • VolumeCloneController - clone operations, but only when the volume is in VolumeCloneStateCopyCompletedAwaitingHealthy state
note

The VolumeCloneController is only interruptible in a specific state. During the data copy phase, clone operations cannot be interrupted. Interruption is only allowed after the copy completes and the volume is waiting to become healthy, preventing data corruption during active copy operations.

Workload operations (can trigger interruption):

  • CSIAttacher - Pod workloads requiring the volume on a different node
  • LonghornAPI - manual attachment requests via UI/API
  • ShareManagerController - RWX volume sharing operations

The interruption only occurs when:

  1. The volume's currently attached node has only interruptible tickets
  2. A different node has a workload ticket requesting the volume
note

Interruption is based on ticket type classification, not priority numbers. Priority numbers only affect the selection order during the attachment phase when the volume is detached.

This design ensures background operations never block workload rescheduling, while protecting active workloads from being interrupted by other background tasks.

Real-World Scenarios

Scenario 1: Backup During Active Pod Usage

  • Pod is running on node-A with a CSIAttacher ticket
  • BackupController creates a ticket for node-A (same node)
  • Both tickets coexist peacefully - backup runs alongside the Pod
  • CSI attachment and backup execution use the engine on the same node, avoiding a node transition.

Scenario 2: Backup Interrupted by Pod Workload

  • BackupController is running on node-A (only ticket present)
  • A Pod requiring this volume is scheduled to node-B, CSIAttacher creates a ticket for node-B
  • VolumeAttachment Controller detects: interruptible ticket on node-A, workload ticket on node-B
  • Volume detaches from node-A (backup interrupted), attaches to node-B (csi attacher)
  • Backup will retry later automatically

Scenario 3: Detached Volume Snapshot

  • Volume is detached, SnapshotController creates a ticket
  • Volume attaches temporarily for snapshot creation
  • After snapshot completes, ticket is removed
  • Volume auto-detaches if no other tickets exist

Usage Examples

The following examples demonstrate how VolumeAttachment resources behave in common scenarios. Each example shows the complete YAML resource state at different stages, helping you understand what to look for when troubleshooting or monitoring Longhorn operations.

Example 1: VolumeSnapshot Creation (Longhorn VolumeAttachment Only)

VolumeSnapshot operations use only Longhorn VolumeAttachment without involving Kubernetes VolumeAttachment. This demonstrates that Longhorn VolumeAttachment can operate independently for internal operations.

┌─────────────────────────────────────────────────────────────┐
│ User Creates VolumeSnapshot via kubectl │
│ kubectl apply -f volumesnapshot.yaml │
└─────────────────────┬───────────────────────────────────────┘


┌─────────────────────────────────────────────────────────────┐
│ Longhorn Snapshot Controller │
│ Detects new VolumeSnapshot resource │
└─────────────────────┬───────────────────────────────────────┘


┌─────────────────────────────────────────────────────────────┐
│ Snapshot Controller Checks Volume State │
│ If Volume is detached → needs attachment for snapshot │
└─────────────────────┬───────────────────────────────────────┘


┌─────────────────────────────────────────────────────────────┐
│ Snapshot Controller Creates Attachment Ticket │
│ Updates Longhorn VolumeAttachment: │
│ AttachmentTickets: │
│ snapshot-<snapshot-name>: │
│ Type: snapshot-controller │
│ NodeID: <volume-owner-node> │
│ Parameters: {disableFrontend: "false"} │
│ │
│ ❌ No K8s VolumeAttachment created │
└─────────────────────┬───────────────────────────────────────┘


┌─────────────────────────────────────────────────────────────┐
│ Longhorn VolumeAttachment Controller │
│ Selects snapshot ticket → Updates Volume.Spec.NodeID │
└─────────────────────┬───────────────────────────────────────┘


┌─────────────────────────────────────────────────────────────┐
│ Longhorn Volume Controller │
│ Attaches volume → Starts Engine │
└─────────────────────┬───────────────────────────────────────┘


┌─────────────────────────────────────────────────────────────┐
│ Snapshot Controller │
│ Engine running → Creates snapshot via Engine API │
│ Snapshot complete → Removes attachment ticket │
└─────────────────────┬───────────────────────────────────────┘


┌─────────────────────────────────────────────────────────────┐
│ Volume May Auto-Detach (if no other tickets exist) │
└─────────────────────────────────────────────────────────────┘

The Longhorn VolumeAttachment YAML during snapshot creation:

During Snapshot Creation (ticket exists):

apiVersion: longhorn.io/v1beta2
kind: VolumeAttachment
metadata:
name: pvc-0b9c8d59-0ae8-413c-8bc5-af32b932b8ab
namespace: longhorn-system
generation: 30
spec:
volume: pvc-0b9c8d59-0ae8-413c-8bc5-af32b932b8ab
attachmentTickets:
# Temporary ticket created by Snapshot Controller
snapshot-controller-snapshot-a36bedf5-fb3b-4b30-a10d-ed98f9c0323a:
id: snapshot-controller-snapshot-a36bedf5-fb3b-4b30-a10d-ed98f9c0323a
type: snapshot-controller
nodeID: harvester-node-1
parameters:
disableFrontend: any
status:
attachmentTicketStatuses:
snapshot-controller-snapshot-a36bedf5-fb3b-4b30-a10d-ed98f9c0323a:
id: snapshot-controller-snapshot-a36bedf5-fb3b-4b30-a10d-ed98f9c0323a
satisfied: false # Snapshot in progress
conditions:
- type: Satisfied
status: "False"

After Snapshot Completes (ticket removed):

apiVersion: longhorn.io/v1beta2
kind: VolumeAttachment
metadata:
name: pvc-0b9c8d59-0ae8-413c-8bc5-af32b932b8ab
namespace: longhorn-system
generation: 31 # Incremented after ticket removal
spec:
volume: pvc-0b9c8d59-0ae8-413c-8bc5-af32b932b8ab
attachmentTickets: {} # Ticket removed after snapshot completes
status:
attachmentTicketStatuses: {}

Key Observations:

  • The snapshot-controller ticket type clearly identifies this as a Longhorn internal operation
  • Unlike csi-attacher tickets (triggered by K8s), this ticket is created purely by Longhorn
  • The ticket is temporary - it appears during snapshot creation and disappears when complete
  • No corresponding Kubernetes VolumeAttachment exists for this operation

Example 2: VM Migration

During VM migration, Harvester has two virt-launcher pods for the same VM: the original pod on the source node and a new pod on the target node. This multi-attach capability is enabled for RWX (ReadWriteMany) block mode volumes when the StorageClass has migratable: true parameter, which allows Longhorn to support live VM migration. In the following example, we migrate a VM from harvester-node-2 to harvester-node-0.

apiVersion: longhorn.io/v1beta2
kind: VolumeAttachment
metadata:
creationTimestamp: "2025-12-10T04:19:42Z"
finalizers:
- longhorn.io
generation: 3
labels:
longhornvolume: pvc-0dc9e1f0-4932-4567-aa1e-e70b570058da
name: pvc-0dc9e1f0-4932-4567-aa1e-e70b570058da
namespace: longhorn-system
ownerReferences:
- apiVersion: longhorn.io/v1beta2
kind: Volume
name: pvc-0dc9e1f0-4932-4567-aa1e-e70b570058da
uid: 7cd2ed46-194f-4528-83f7-bbaa5945e7e3
resourceVersion: "2736440"
uid: b2492681-8fcb-4330-9ec6-496afa93e96b
spec:
attachmentTickets:
csi-5852f2d48d96311bb582eeeaad0e38361031d502899416c71cea10795748a84b:
generation: 0
id: csi-5852f2d48d96311bb582eeeaad0e38361031d502899416c71cea10795748a84b
nodeID: harvester-node-2
parameters:
disableFrontend: "false"
lastAttachedBy: ""
type: csi-attacher
csi-f080d69495b619fad93621ff3d57201793952e422304cceac8807e975ccf795d:
generation: 0
id: csi-f080d69495b619fad93621ff3d57201793952e422304cceac8807e975ccf795d
nodeID: harvester-node-0
parameters:
disableFrontend: "false"
lastAttachedBy: ""
type: csi-attacher
volume: pvc-0dc9e1f0-4932-4567-aa1e-e70b570058da
status:
attachmentTicketStatuses:
csi-5852f2d48d96311bb582eeeaad0e38361031d502899416c71cea10795748a84b:
conditions:
- lastProbeTime: ""
lastTransitionTime: "2025-12-10T04:19:49Z"
message: ""
reason: ""
status: "True"
type: Satisfied
generation: 0
id: csi-5852f2d48d96311bb582eeeaad0e38361031d502899416c71cea10795748a84b
satisfied: true
csi-f080d69495b619fad93621ff3d57201793952e422304cceac8807e975ccf795d:
conditions:
- lastProbeTime: ""
lastTransitionTime: "2025-12-10T04:21:00Z"
message: The migrating attachment ticket is satisfied
reason: ""
status: "True"
type: Satisfied
generation: 0
id: csi-f080d69495b619fad93621ff3d57201793952e422304cceac8807e975ccf795d
satisfied: true

After Migration Completes (ticket removed):

apiVersion: longhorn.io/v1beta2
kind: VolumeAttachment
metadata:
creationTimestamp: "2025-12-10T04:19:42Z"
finalizers:
- longhorn.io
generation: 4
labels:
longhornvolume: pvc-0dc9e1f0-4932-4567-aa1e-e70b570058da
name: pvc-0dc9e1f0-4932-4567-aa1e-e70b570058da
namespace: longhorn-system
ownerReferences:
- apiVersion: longhorn.io/v1beta2
kind: Volume
name: pvc-0dc9e1f0-4932-4567-aa1e-e70b570058da
uid: 7cd2ed46-194f-4528-83f7-bbaa5945e7e3
resourceVersion: "2736824"
uid: b2492681-8fcb-4330-9ec6-496afa93e96b
spec:
attachmentTickets:
csi-f080d69495b619fad93621ff3d57201793952e422304cceac8807e975ccf795d:
generation: 0
id: csi-f080d69495b619fad93621ff3d57201793952e422304cceac8807e975ccf795d
nodeID: harvester-node-0
parameters:
disableFrontend: "false"
lastAttachedBy: ""
type: csi-attacher
volume: pvc-0dc9e1f0-4932-4567-aa1e-e70b570058da
status:
attachmentTicketStatuses:
csi-f080d69495b619fad93621ff3d57201793952e422304cceac8807e975ccf795d:
conditions:
- lastProbeTime: ""
lastTransitionTime: "2025-12-10T04:21:00Z"
message: ""
reason: ""
status: "True"
type: Satisfied
generation: 0
id: csi-f080d69495b619fad93621ff3d57201793952e422304cceac8807e975ccf795d
satisfied: true

Key Observations:

  • Two CSI attachment tickets coexist: One pointing to the source node (harvester-node-2) and another to the target node (harvester-node-0)
  • Both tickets are csi-attacher type: Indicating they were both triggered by Kubernetes VolumeAttachment through the CSI flow
  • Both tickets have satisfied: true status: This demonstrates Longhorn's support for attaching the same volume to multiple nodes simultaneously (RWX-like behavior for migration)
  • Target node ticket has special message: "The migrating attachment ticket is satisfied" explicitly identifies this as a migration scenario
  • Multi-attach is temporary: This dual-attachment state only exists during VM migration; the source node's ticket will be removed after migration completes

Summary

Longhorn uses two different VolumeAttachment resources for different purposes:

Kubernetes VolumeAttachment (storage.k8s.io/v1) follows the standard CSI specification and is created only when Pods are scheduled to nodes. It represents Kubernetes' official attachment intent and is managed by K8s Attach/Detach Controller and CSI External-Attacher.

Longhorn VolumeAttachment (longhorn.io/v1beta2) extends beyond CSI to support Longhorn's advanced features. It's created for multiple scenarios, including Pod workloads, snapshots, backups, clones, and manual operations. It uses a ticket-based system to coordinate concurrent attachment requests and is managed collaboratively by multiple Longhorn controllers.

Why both are needed: K8s VolumeAttachment ensures CSI compliance with the Kubernetes ecosystem, while Longhorn VolumeAttachment enables automation for background operations without manual intervention. Importantly, not all Longhorn operations trigger K8s VolumeAttachment—for example, creating a VolumeSnapshot only creates a Longhorn VolumeAttachment ticket (snapshot-controller), not a K8s VolumeAttachment.

When troubleshooting: Check both resources. K8s VolumeAttachment shows the CSI standard workflow status, while Longhorn VolumeAttachment shows the complete picture, including all internal operations via attachment tickets. Look at the ticket type to identify the operation source: csi-attacher means triggered by the K8s VolumeAttachment (Pod workload), while snapshot-controller, backup-controller, etc. indicate Longhorn internal operations.

· 5 min read
Webber Huang

In this Harvester Knowledge Base article, Ivan Sim provided comprehensive guidance on using Velero to perform backup and restore operations for VMs with external storage in Harvester.

However, in certain scenarios, users may require the VM filesystem to be quiesced during Velero backup creation to prevent data corruption, especially when the VM is experiencing heavy I/O operations.

This article describes how to customize Velero Backup Hooks to implement filesystem freeze during Velero backup processing, ensuring data consistency in the backup content.

Background Knowledge

KubeVirt's virt-freezer provides a mechanism to freeze and thaw guest filesystems. This capability can be leveraged to ensure filesystem consistency during VM backups. However, certain prerequisites must be met for filesystem freeze/thaw operations to function properly:

Prerequisites for Filesystem Freeze

  • QEMU Guest Agent must be enabled in the guest VM
    • Verify this by checking if the VMI has AgentConnected in its status
  • Guest VM must be properly configured for related libvirt commands
    • When virt-freezer is triggered, KubeVirt communicates with the QEMU Guest Agent via libvirt commands such as guest-fsfreeze-freeze
    • The guest agent translates these commands to OS-specific calls:
      • Linux systems: Uses fsfreeze syscalls
      • Windows systems: Uses VSS (Volume Shadow Copy Service) APIs

Common Configuration Challenges

Based on Harvester project experience, some guest operating systems require additional configuration:

  • Linux distributions (e.g., RHEL, SLE Micro): May lack sufficient permissions for filesystem freeze operations by default, requiring custom policies
  • Windows guests: Require the VSS service to be enabled for filesystem freeze functionality

Important: Filesystem freeze/thaw functionality depends on guest VM configuration, which is outside Harvester's control. Users are responsible for ensuring compatibility before implementing Velero backup hooks with filesystem freeze.

Verifying Filesystem Freeze Compatibility

To confirm that your VM supports filesystem freeze operations:

  1. Access the virtual machine's virt-launcher compute container:

    POD=$(kubectl get pods -n <VM Namespace> \
    -l vm.kubevirt.io/name=<VM Name> \
    -o jsonpath='{.items[0].metadata.name}')
    kubectl exec -it $POD -n default -c compute -- bash
  2. Test filesystem freeze using the virt-freezer application available in the compute container:

    virt-freezer --freeze --namespace <VM namespace> --name <VM name>
  3. Critical: Always verify the freeze operation result and thaw the VM filesystems before performing any other operations

Prerequisites

All preparation steps outlined in External CSI Storage Backup and Restore With Velero are mandatory, including:

  • Harvester installation and configuration
  • Velero installation and setup
  • S3-compatible storage configuration
  • Proper networking and permissions

Implementing Filesystem Freeze Hooks for VM Backup Consistency

Velero supports pre and post backup hooks that can be integrated with KubeVirt's virt-freezer to ensure filesystem consistency during VM backups.

Configuring VM Template Annotations

For all VMs requiring data consistency, add the following annotations to the VM template:

apiVersion: kubevirt.io/v1
kind: VirtualMachine
metadata:
name: vm-nfs
namespace: demo
spec:
template:
metadata:
annotations:
# These annotations will be applied to the virt-launcher pod
pre.hook.backup.velero.io/command: '["/usr/bin/virt-freezer", "--freeze", "--namespace", "<VM Namespace>", "--name", "<VM Name>"']'
pre.hook.backup.velero.io/container: compute
pre.hook.backup.velero.io/on-error: Fail
pre.hook.backup.velero.io/timeout: 30s

post.hook.backup.velero.io/command: '["/usr/bin/virt-freezer", "--unfreeze", "--namespace", "<VM Namespace>", "--name", "<VM Name>"]'
post.hook.backup.velero.io/container: compute
post.hook.backup.velero.io/timeout: 30s
spec:
# ...rest of VM spec...

These annotations will be propagated to the related virt-launcher pod and instruct Velero to:

  • Freeze the VM filesystem before backup creation begins
  • Thaw the VM filesystem after backup completion

Important: Replace <VM Namespace> and <VM Name> with the actual namespace and name of your VM.

Creating a Velero Backup with Filesystem Freeze

After applying the Velero pre/post hook annotations to the VM manifest, follow the backup procedures described in External CSI Storage Backup and Restore With Velero.

Verifying Successful Hook Execution

If the guest VM is configured correctly, the Velero backup will complete successfully with HooksAttempted indicating successful hook execution.

Check the backup status using:

velero backup describe [Backup Name] --details

Example output showing successful hook execution:

Name:         demo
Namespace: velero
Labels: velero.io/storage-location=default
Annotations: velero.io/resource-timeout=10m0s
velero.io/source-cluster-k8s-gitversion=v1.33.3+rke2r1
velero.io/source-cluster-k8s-major-version=1
velero.io/source-cluster-k8s-minor-version=33

Phase: Completed


Namespaces:
Included: demo
Excluded: <none>

Resources:
Included: *
Excluded: <none>
Cluster-scoped: auto

Label selector: <none>

Or label selector: <none>

Storage Location: default

Velero-Native Snapshot PVs: auto
Snapshot Move Data: true
Data Mover: velero

....

Backup Volumes:
Velero-Native Snapshots: <none included>

CSI Snapshots:
demo/vm-nfs-disk-0-au2ej:
Data Movement:
Operation ID: du-be5417aa-498e-4b93-b59f-e6498f95a6df.d7f97dab-3bb1-41e189381
Data Mover: velero
Uploader Type: kopia
Moved data Size (bytes): 5368709120
Result: succeeded

Pod Volume Backups: <none included>

HooksAttempted: 2
HooksFailed: 0

The output shows that Velero pre/post backup hooks completed successfully. In this case, the hooks are connected to guest VM filesystem freeze and thaw operations to ensure data consistency.

Restoring the Velero Backup

Follow the restoration procedures described in External CSI Storage Backup and Restore With Velero to restore the namespace using Velero.

Troubleshooting

If you encounter issues with filesystem freeze operations:

  1. Verify QEMU Guest Agent status in the VMI
  2. Check guest OS configuration for filesystem freeze support
  3. Review Velero hook logs for specific error messages
  4. Test virt-freezer manually as described in the verification section

Conclusion

Implementing filesystem freeze hooks with Velero ensures data consistency during VM backups by quiescing the filesystem before snapshot creation. This approach is particularly valuable for VMs with high I/O activity or critical data that requires point-in-time consistency guarantees.

· 3 min read
Tim Serong

Harvester allows you to add disks as data volumes. However, only disks that have a World Wide Name (WWN) are displayed on the UI. This occurs because the Harvester node-disk-manager uses the ID_WWN value from udev to uniquely identify disks. The value may not exist in certain situations, particularly when the disks are connected to certain hardware RAID controllers. In these situations, you can view the disks only if you access the host using SSH and run a command such as cat /proc/partitions.

To allow extra disks without WWNs to be visible to Harvester, perform either of the following workarounds:

Workaround 1: Create a filesystem on the disk

caution

Use this method only if the provisioner of the extra disk is Longhorn V1, which is filesystem-based. This method will not work correctly with LVM and Longhorn V2, which are both block device-based.

When you create a filesystem on a disk (for example, using the command mkfs.ext4 /dev/sda), a filesystem UUID is assigned to the disk. Harvester uses this value to identify disks without a WWN.

In Harvester versions earlier than v1.6.0, you can use this workaround for only one extra disk because of a bug in duplicate device checking.

Workaround 2: Add a udev rule for generating fake WWNs

note

This method works with all of the supported provisioners.

You can add a udev rule that generates a fake WWN for each extra disk based on the device serial number. Harvester accepts the generated WWNs because the only requirement is a unique ID_WWN value as presented by udev.

A YAML file containing the necessary udev rule must be created in the /oem directory on each host. This process can be automated across the Harvester cluster using a CloudInit Resource.

  1. Create a YAML file named fake-scsi-wwn-generator.yaml with the following contents:

    apiVersion: node.harvesterhci.io/v1beta1
    kind: CloudInit
    metadata:
    name: fake-scsi-wwn-generator
    spec:
    matchSelector: {}
    filename: 90_fake_scsi_wwn_generator.yaml
    contents: |
    name: "Add udev rules to generate missing SCSI disk WWNs"
    stages:
    initramfs:
    - files:
    - path: /etc/udev/rules.d/59-fake-scsi-wwn-generator.rules
    permissions: 420
    owner: 0
    group: 0
    content: |
    # For anything that looks like a SCSI disk (/dev/sd*),
    # if it has a serial number, but does _not_ have a WWN,
    # create a fake WWN based on the serial number. We need
    # to set both ID_WWN so Harvester's node-disk-manager
    # can see the WWN, and ID_WWN_WITH_EXTENSION which is
    # what 60-persistent-storage.rules uses to generate a
    # /dev/disk/by-id/wwn-* symlink for the device.
    ACTION=="add|change", SUBSYSTEM=="block", KERNEL=="sd*[!0-9]", \
    ENV{ID_SERIAL}=="?*", \
    ENV{ID_WWN}!="?*", ENV{ID_WWN_WITH_EXTENSION}!="?*", \
    ENV{ID_WWN}="fake.$env{ID_SERIAL}", \
    ENV{ID_WWN_WITH_EXTENSION}="fake.$env{ID_SERIAL}"
  2. Apply the file's contents to the cluster by running the command kubectl apply -f fake-scsi-wwn-generator.yaml.

    The file /oem/90_fake_scsi_wwn_generator.yaml is automatically created on all cluster nodes.

  3. Reboot all nodes to apply the new udev rule.

Once the rule is applied, you should be able to view and add extra disks that were previously not visible on the Harvester UI.

References

· 8 min read
Ivan Sim

Harvester 1.5 introduces support for the provisioning of virtual machine root volumes and data volumes using external Container Storage Interface (CSI) drivers.

This article demonstrates how to use Velero 1.16.0 to perform backup and restore of virtual machines in Harvester.

It goes through commands and manifests to:

  • Back up virtual machines in a namespace, their NFS CSI volumes, and associated namespace-scoped configuration
  • Export the backup artifacts to an AWS S3 bucket
  • Restore to a different namespace on the same cluster
  • Restore to a different cluster

Velero is a Kubernetes-native backup and restore tool that enables users to perform scheduled and on-demand backups of virtual machines to external object storage providers such as S3, Azure Blob, or GCS, aligning with enterprise backup and disaster recovery practices.

note

The commands and manifests used in this article are tested with Harvester 1.5.1.

The CSI NFS driver and Velero configuration and versions used are for demonstration purposes only. Adjust them according to your environment and requirements.

important

The examples provided are intended to backup and restore Linux virtual machine workloads. It is not suitable for backing up guest clusters provisioned via the Harvester Rancher integration.

To backup and restore guest clusters like RKE2, please refer to the distro official documentation.

Harvester Installation

Refer to the Harvester documentation for installation requirements and options.

The kubeconfig file of the Harvester cluster can be retrieved following the instructions here.

Install and Configure Velero

Download the Velero CLI.

Set the following shell variables:

BUCKET_NAME=<your-s3-bucket-name>
BUCKET_REGION=<your-s3-bucket-region>
AWS_CREDENTIALS_FILE=<absolute-path-to-your-aws-credentials-file>

Install Velero on the Harvester cluster:

velero install \
--provider aws \
--features=EnableCSI \
--plugins "velero/velero-plugin-for-aws:v1.12.0,quay.io/kubevirt/kubevirt-velero-plugin:v0.7.1" \
--bucket "${BUCKET_NAME}" \
--secret-file "${AWS_CREDENTIALS_FILE}" \
--backup-location-config region="${BUCKET_REGION}" \
--snapshot-location-config region="${BUCKET_REGION}" \
--use-node-agent
  • In this setup, Velero is configured to:

    • Run in the velero namespace
    • Enable CSI volume snapshot APIs
    • Enable the built-in node agent data movement controllers and pods
    • Use the velero-plugin-for-aws plugin to manage interactions with the S3 object store
    • Use the kubevirt-velero-plugin plugin to backup and restore KubeVirt resources

Confirm that Velero is installed and running:

kubectl -n velero get po
NAME                      READY   STATUS    RESTARTS         AGE
node-agent-875mr 1/1 Running 0 1d
velero-745645565f-5dqgr 1/1 Running 0 1d

Configure the velero CLI to output the backup and restore status of CSI objects:

velero client config set features=EnableCSI

Deploy the NFS CSI and Example Server

Follow the instructions in the NFS CSI documentation to set up the NFS CSI driver, its storage class, and an example NFS server.

The NFS CSI volume snapshotting capability must also be enabled following the instructions here.

Confirm that the NFS CSI and example server are running:

kubectl get po -A -l 'app in (csi-nfs-node,csi-nfs-controller,nfs-server)'
NAMESPACE     NAME                                  READY   STATUS    RESTARTS    AGE
default nfs-server-b767db8c8-9ltt4 1/1 Running 0 1d
kube-system csi-nfs-controller-5bf646f7cc-6vfxn 5/5 Running 0 1d
kube-system csi-nfs-node-9z6pt 3/3 Running 0 1d

The default NFS CSI storage class is named nfs-csi:

kubectl get sc nfs-csi
NAME      PROVISIONER      RECLAIMPOLICY   VOLUMEBINDINGMODE   ALLOWVOLUMEEXPANSION   AGE
nfs-csi nfs.csi.k8s.io Delete Immediate true 14d

Confirm that the default NFS CSI volume snapshot class csi-nfs-snapclass is also installed:

kubectl get volumesnapshotclass csi-nfs-snapclass
NAME                DRIVER           DELETIONPOLICY   AGE
csi-nfs-snapclass nfs.csi.k8s.io Delete 14d

Preparing the Virtual Machine and Image

Create a custom namespace named demo-src:

kubectl create ns demo-src

Follow the instructions in the Image Management documentation to upload the Ubuntu 24.04 raw image from https://cloud-images.ubuntu.com/minimal/releases/noble/ to Harvester.

The storage class of the image must be set to nfs-csi, per the Third-Party Storage Support documentation.

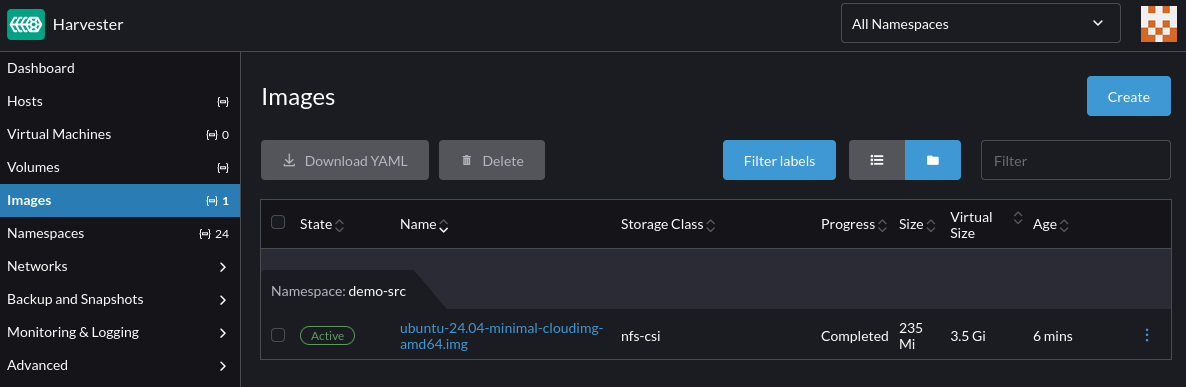
Confirm the virtual machine image is successfully uploaded to Harvester:

image

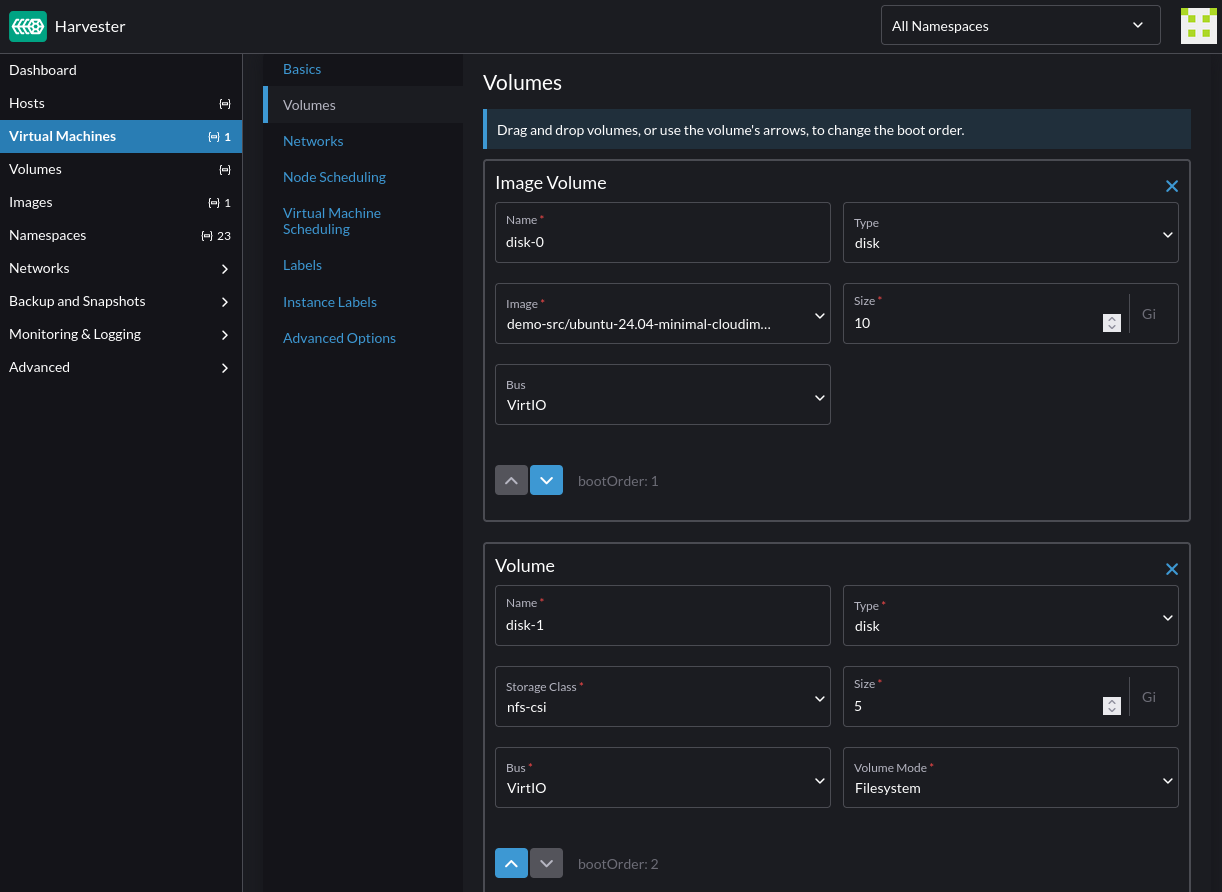
Follow the instructions in the third-party storage documentation to create a virtual machine with NFS root and data volumes, using the image uploaded in the previous step.

For NFS CSI snapshot to work, the NFS data volume must have the volumeMode set to Filesystem: image

optional

For testing purposes, once the virtual machine is ready, access it via SSH and add some files to both the root and data volumes.

The data volume needs to be partitioned, with a file system created and mounted before files can be written to it.

Backup the Source Namespace

Use the velero CLI to create a backup of the demo-src namespace using Velero's built-in data mover:

BACKUP_NAME=backup-demo-src-`date "+%s"`

velero backup create "${BACKUP_NAME}" \
--include-namespaces demo-src \
--snapshot-move-data
info

For more information on Velero's data mover, see its documentation on CSI data snapshot movement capability.

This creates a backup of the demo-src namespace containing resources like the virtual machine created earlier, its volumes, secrets and other associated configuration.

Depending on the size of the virtual machine and its volumes, the backup may take a while to complete.

The DataUpload custom resources provide insights into the backup progress:

kubectl -n velero get datauploads -l velero.io/backup-name="${BACKUP_NAME}"

Confirm that the backup completed successfully:

velero backup get "${BACKUP_NAME}"
NAME                         STATUS      ERRORS   WARNINGS   CREATED                         EXPIRES   STORAGE LOCATION   SELECTOR
backup-demo-src-1747954979 Completed 0 0 2025-05-22 16:04:46 -0700 PDT 29d default <none>

After the backup completes, Velero removes the CSI snapshots from the storage side to free up the snapshot data space.

tips

The velero backup describe and velero backup logs commands can be used to assess details of the backup including resources included, skipped, and any warnings or errors encountered during the backup process.

Restore To A Different Namespace

This section describes how to restore the backup from the demo-src namespace to a new namespace named demo-dst.

Save the following restore modifier to a local file named modifier-data-volumes.yaml:

cat <<EOF > modifier-data-volumes.yaml
version: v1
resourceModifierRules:
- conditions:
groupResource: persistentvolumeclaims
matches:
- path: /metadata/annotations/harvesterhci.io~1volumeForVirtualMachine
value: "\"true\""
patches:
- operation: remove
path: /metadata/annotations/harvesterhci.io~1volumeForVirtualMachine
EOF

This restore modifier removes the harvesterhci.io/volumeForVirtualMachine annotation from the virtual machine data volumes to ensure that the restoration do not conflict with the CDI volume import populator.

Create the restore modifier:

kubectl -n velero create cm modifier-data-volumes --from-file=modifier-data-volumes.yaml

Assign the backup name to a shell variable:

BACKUP_NAME=backup-demo-src-1747954979

Start the restore operation:

velero restore create \
--from-backup "${BACKUP_NAME}" \
--namespace-mappings "demo-src:demo-dst" \
--exclude-resources "virtualmachineimages.harvesterhci.io" \
--resource-modifier-configmap "modifier-data-volumes" \
--labels "velero.kubevirt.io/clear-mac-address=true,velero.kubevirt.io/generate-new-firmware-uuid=true"
  • During the restore:

    • The virtual machine MAC address and firmware UUID are reset to avoid potential conflicts with existing virtual machines.
    • the virtual machine image manifest is excluded because Velero restores the entire state of the virtual machine from the backup.
    • the modifier-data-volumes restore modifier is invoked to modify the virtual machine data volumes metadata to prevent conflicts with the CDI volume import populator.

While the restore operation is still in-progress, the DataDownload custom resources can be used to examine the progress of the operation:

RESTORE_NAME=backup-demo-src-1747954979-20250522164015

kubectl -n velero get datadownload -l velero.io/restore-name="${RESTORE_NAME}"

Confirm that the restore completed successfully:

velero restore get
NAME                                        BACKUP                       STATUS      STARTED                         COMPLETED                       ERRORS   WARNINGS   CREATED                         SELECTOR
backup-demo-src-1747954979-20250522164015 backup-demo-src-1747954979 Completed 2025-05-22 16:40:15 -0700 PDT 2025-05-22 16:40:49 -0700 PDT 0 6 2025-05-22 16:40:15 -0700 PDT <none>

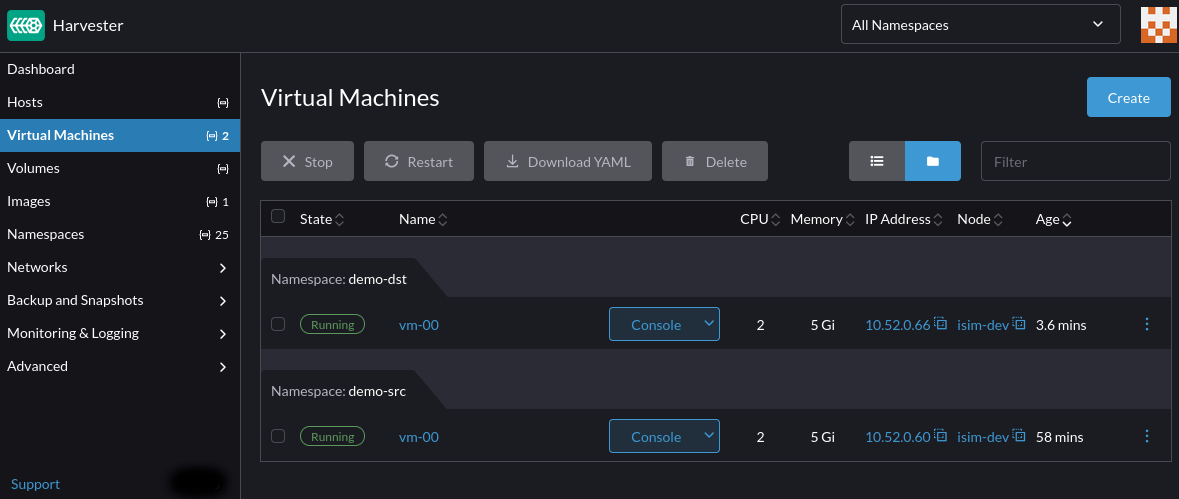
Verify that the virtual machine and its configuration are restored to the new demo-dst namespace:

image

note

Velero uses Kopia as its default data mover. This issue describes some of its limitations on advanced file system features such as setuid/gid, hard links, mount points, sockets, xattr, ACLs, etc.

Velero provides the --data-mover option to configure custom data movers to satisfy different use cases. For more information, see the Velero's documentation.

tips

The velero restore describe and velero restore logs commands provide more insights into the restore operation including the resources restored, skipped, and any warnings or errors encountered during the restore process.

Restore To A Different Cluster

This section extends the above scenario to demonstrate the steps to restore the backup to a different Harvester cluster.

On the target cluster, install Velero, and set up the NFS CSI and NFS server following the instructions from the Deploy the NFS CSI and Example Server section.

Once Velero is configured to use the same backup location as the source cluster, it automatically discovers the available backups:

velero backup get
NAME                         STATUS      ERRORS   WARNINGS   CREATED                         EXPIRES   STORAGE LOCATION   SELECTOR
backup-demo-src-1747954979 Completed 0 0 2025-05-22 16:04:46 -0700 PDT 29d default <none>

Follow the steps in the Restore To A Different Namespace section to restore the backup on the target cluster.

Remove the --namespace-mappings option to set the restored namespace to demo-src on the target cluster.

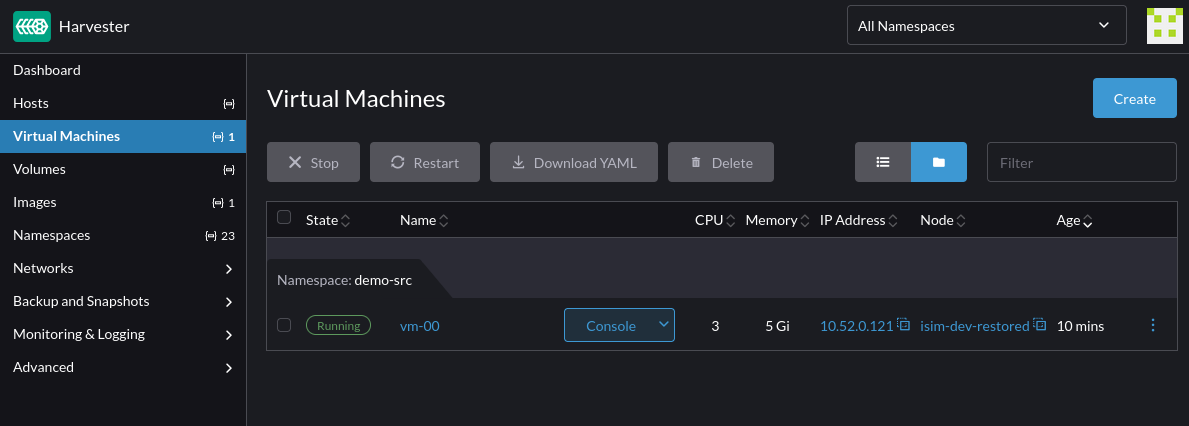
Confirm that the virtual machine and its configuration are restored to the demo-src namespace:

image

Select Longhorn Volume Snapshot Class

To perform Velero backup and restore of virtual machines with Longhorn volumes, label the Longhorn volume snapshot class longhorn as follows:

kubectl label volumesnapshotclass longhorn velero.io/csi-volumesnapshot-class

This helps Velero to find the correct Longhorn snapshot class to use during backup and restore.

Limitations

Enhancements related to the limitations described in this section are tracked at https://github.com/harvester/harvester/issues/8367.

  • By default, Velero only supports resource filtering by resource groups and labels. In order to backup/restore a single instance of virtual machine, custom labels must be applied to the virtual machine, and its virtual machine instance, pod, data volumes, persistent volumes claim, persistent volumes and cloudinit secret resources. It's recommended to backup the entire namespace and perform resource filtering during restore to ensure that backup contains all the dependency resources required by the virtual machine.

  • The restoration of virtual machine image is not fully supported yet.

· 4 min read
Vicente Cheng

In earlier versions of Harvester (v1.0.3 and prior), Longhorn volumes may get corrupted during the replica rebuilding process (reference: Analysis: Potential Data/Filesystem Corruption). In Harvester v1.1.0 and later versions, the Longhorn team has fixed this issue. This article covers manual steps you can take to scan the VM's filesystem and repair it if needed.

Stop The VM And Backup Volume

Before you scan the filesystem, it is recommend you back up the volume first. For an example, refer to the following steps to stop the VM and backup the volume.

  • Find the target VM.

finding the target VM

  • Stop the target VM.

Stop the target VM

The target VM is stopped and the related volumes are detached. Now go to the Longhorn UI to backup this volume.

  • Enable Developer Tools & Features (Preferences -> Enable Developer Tools & Features).

Preferences then enable developer mode Enable the developer mode

  • Click the button and select Edit Config to edit the config page of the VM.

goto edit config page of VM

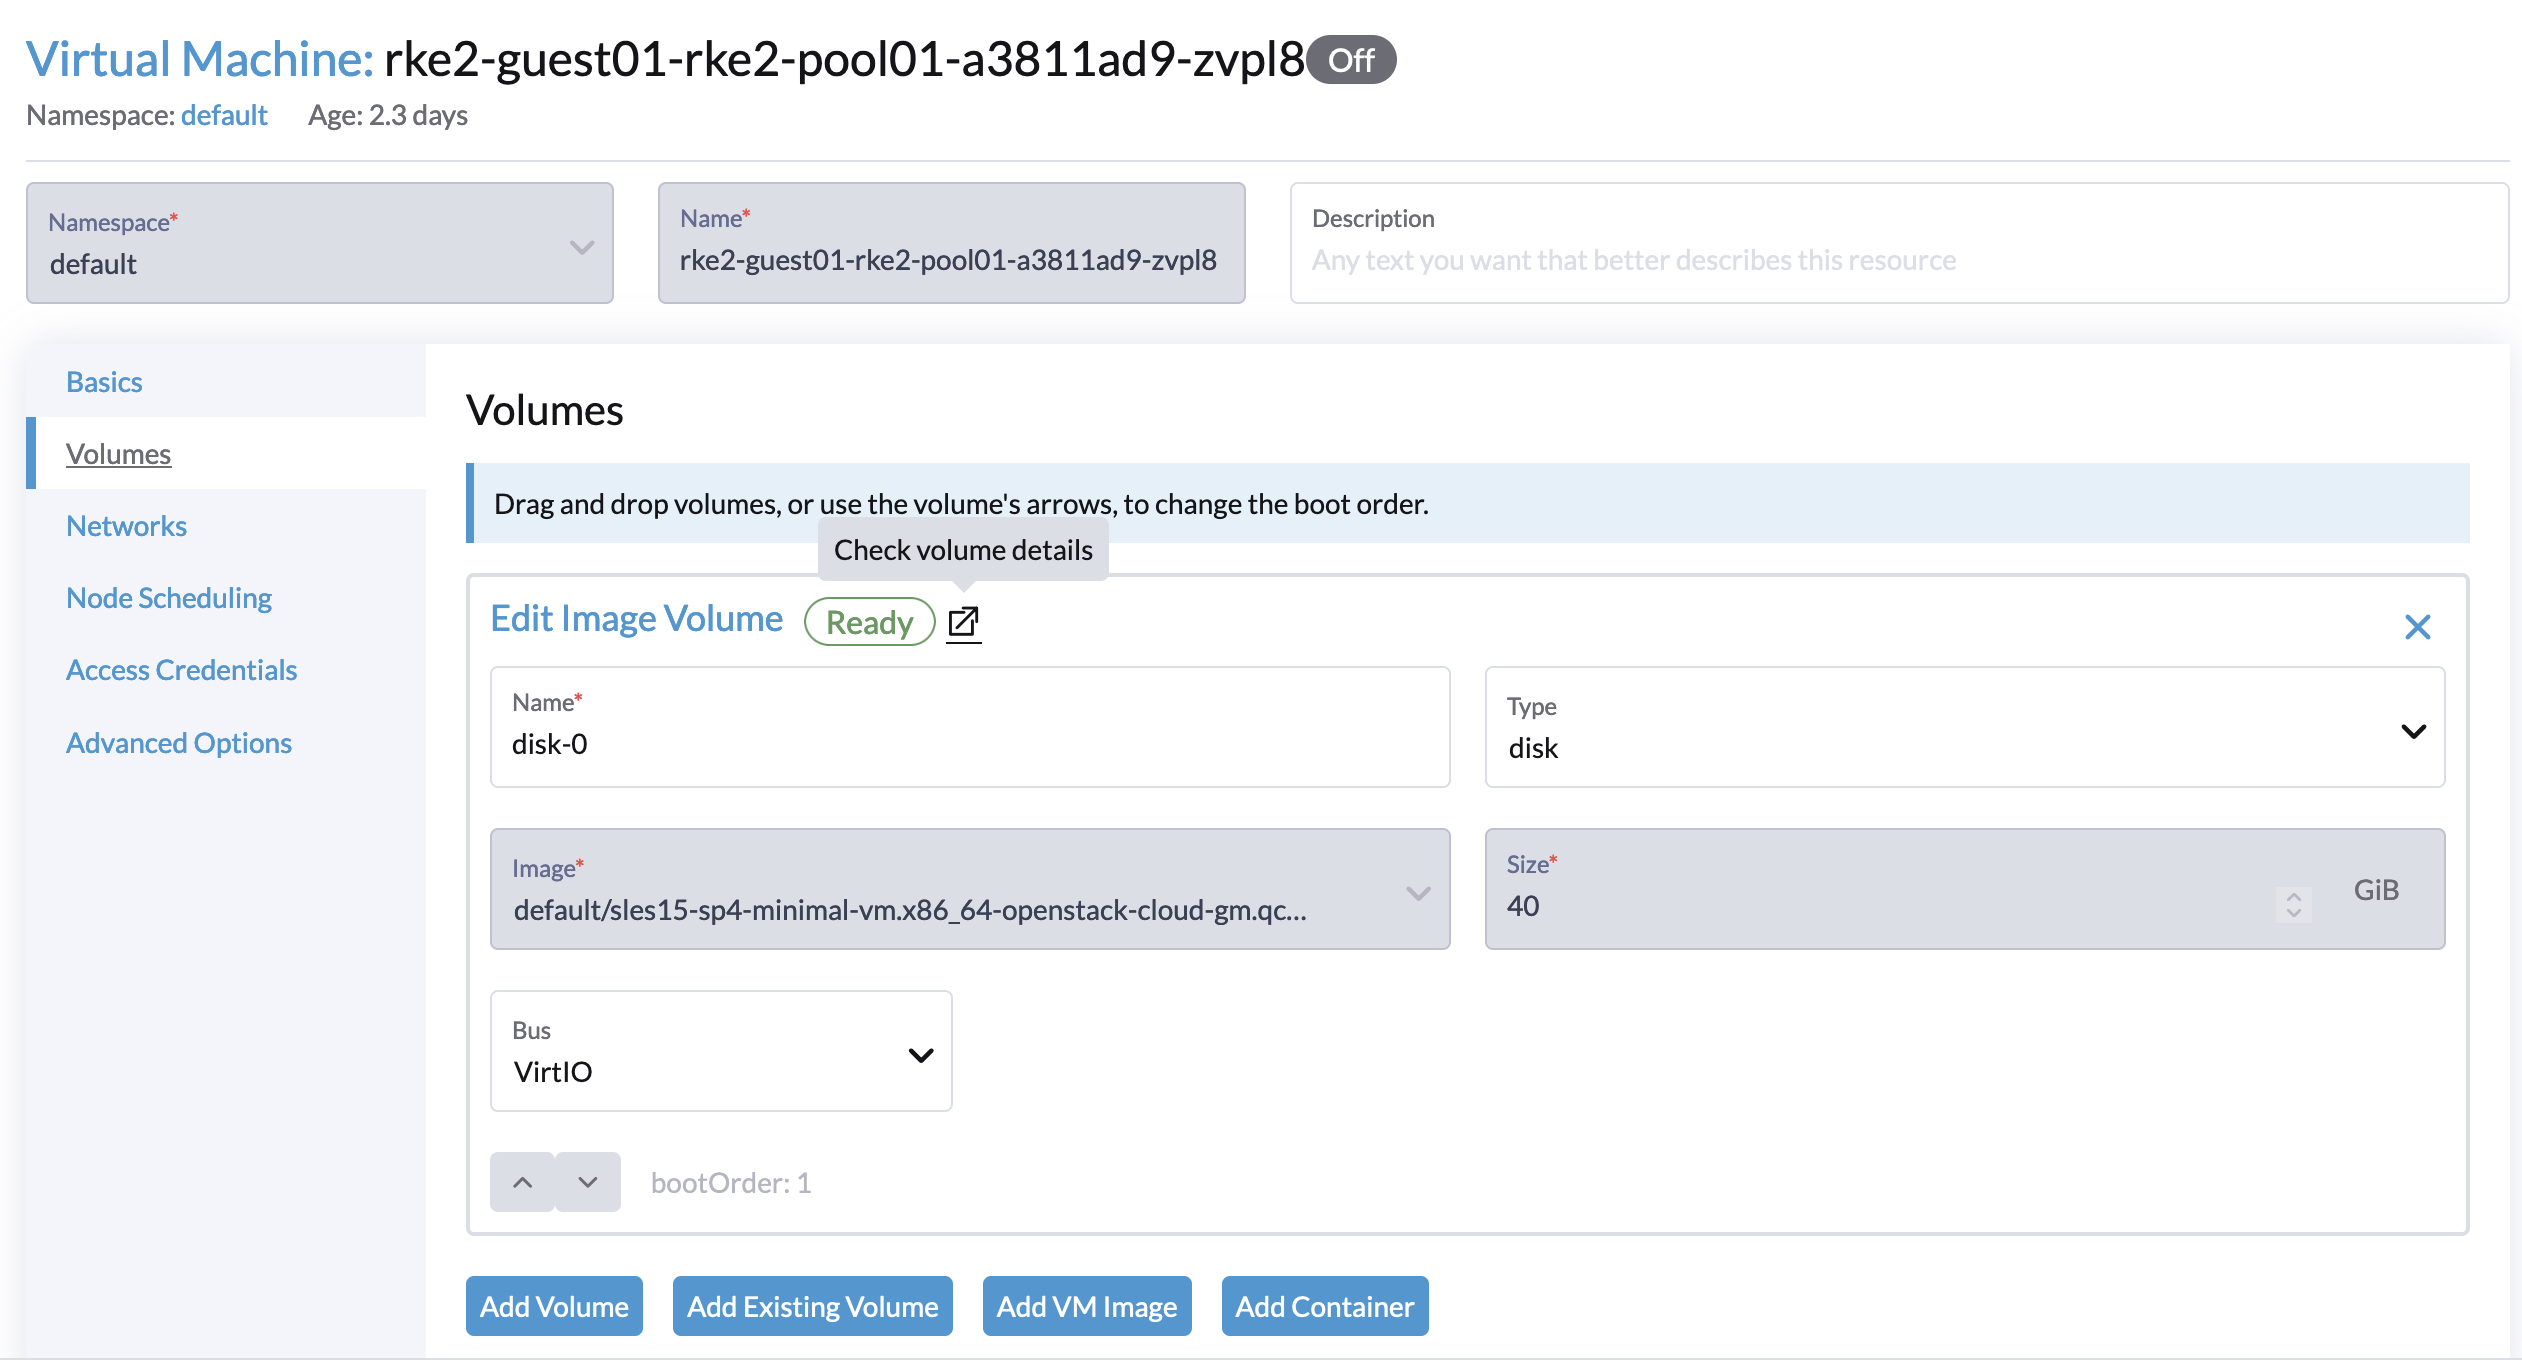
  • Go to the Volumes tab and select Check volume details.

link to longhorn volume page

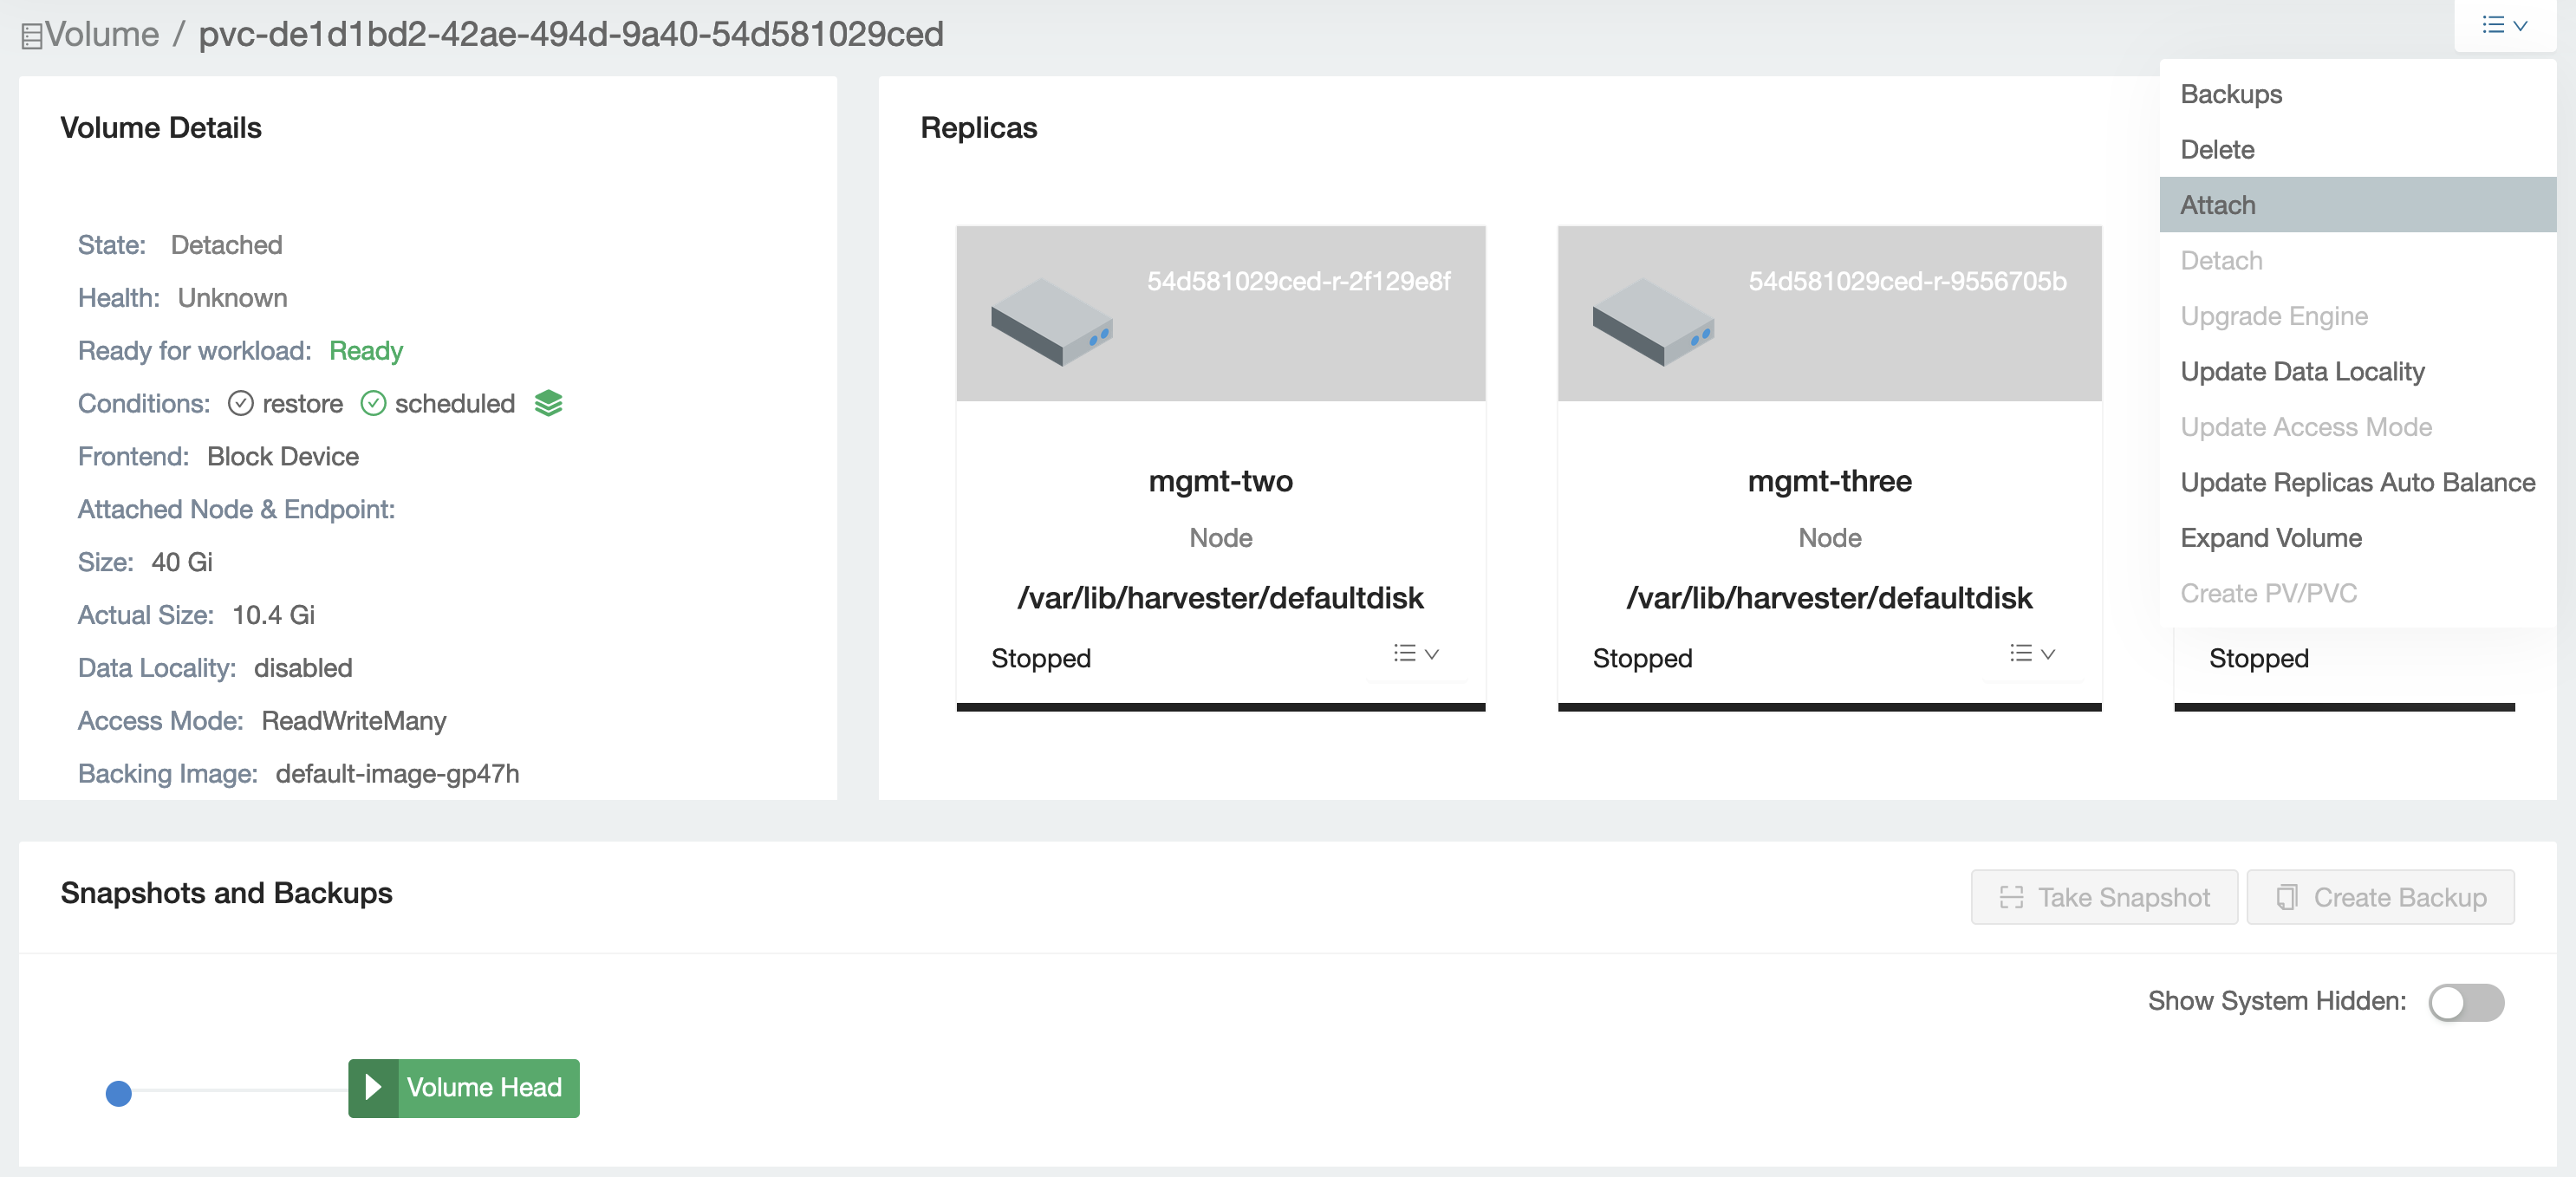
  • Click the dropdown menu on the right side and select 'Attach' to attach the volume again.

attach this volume again

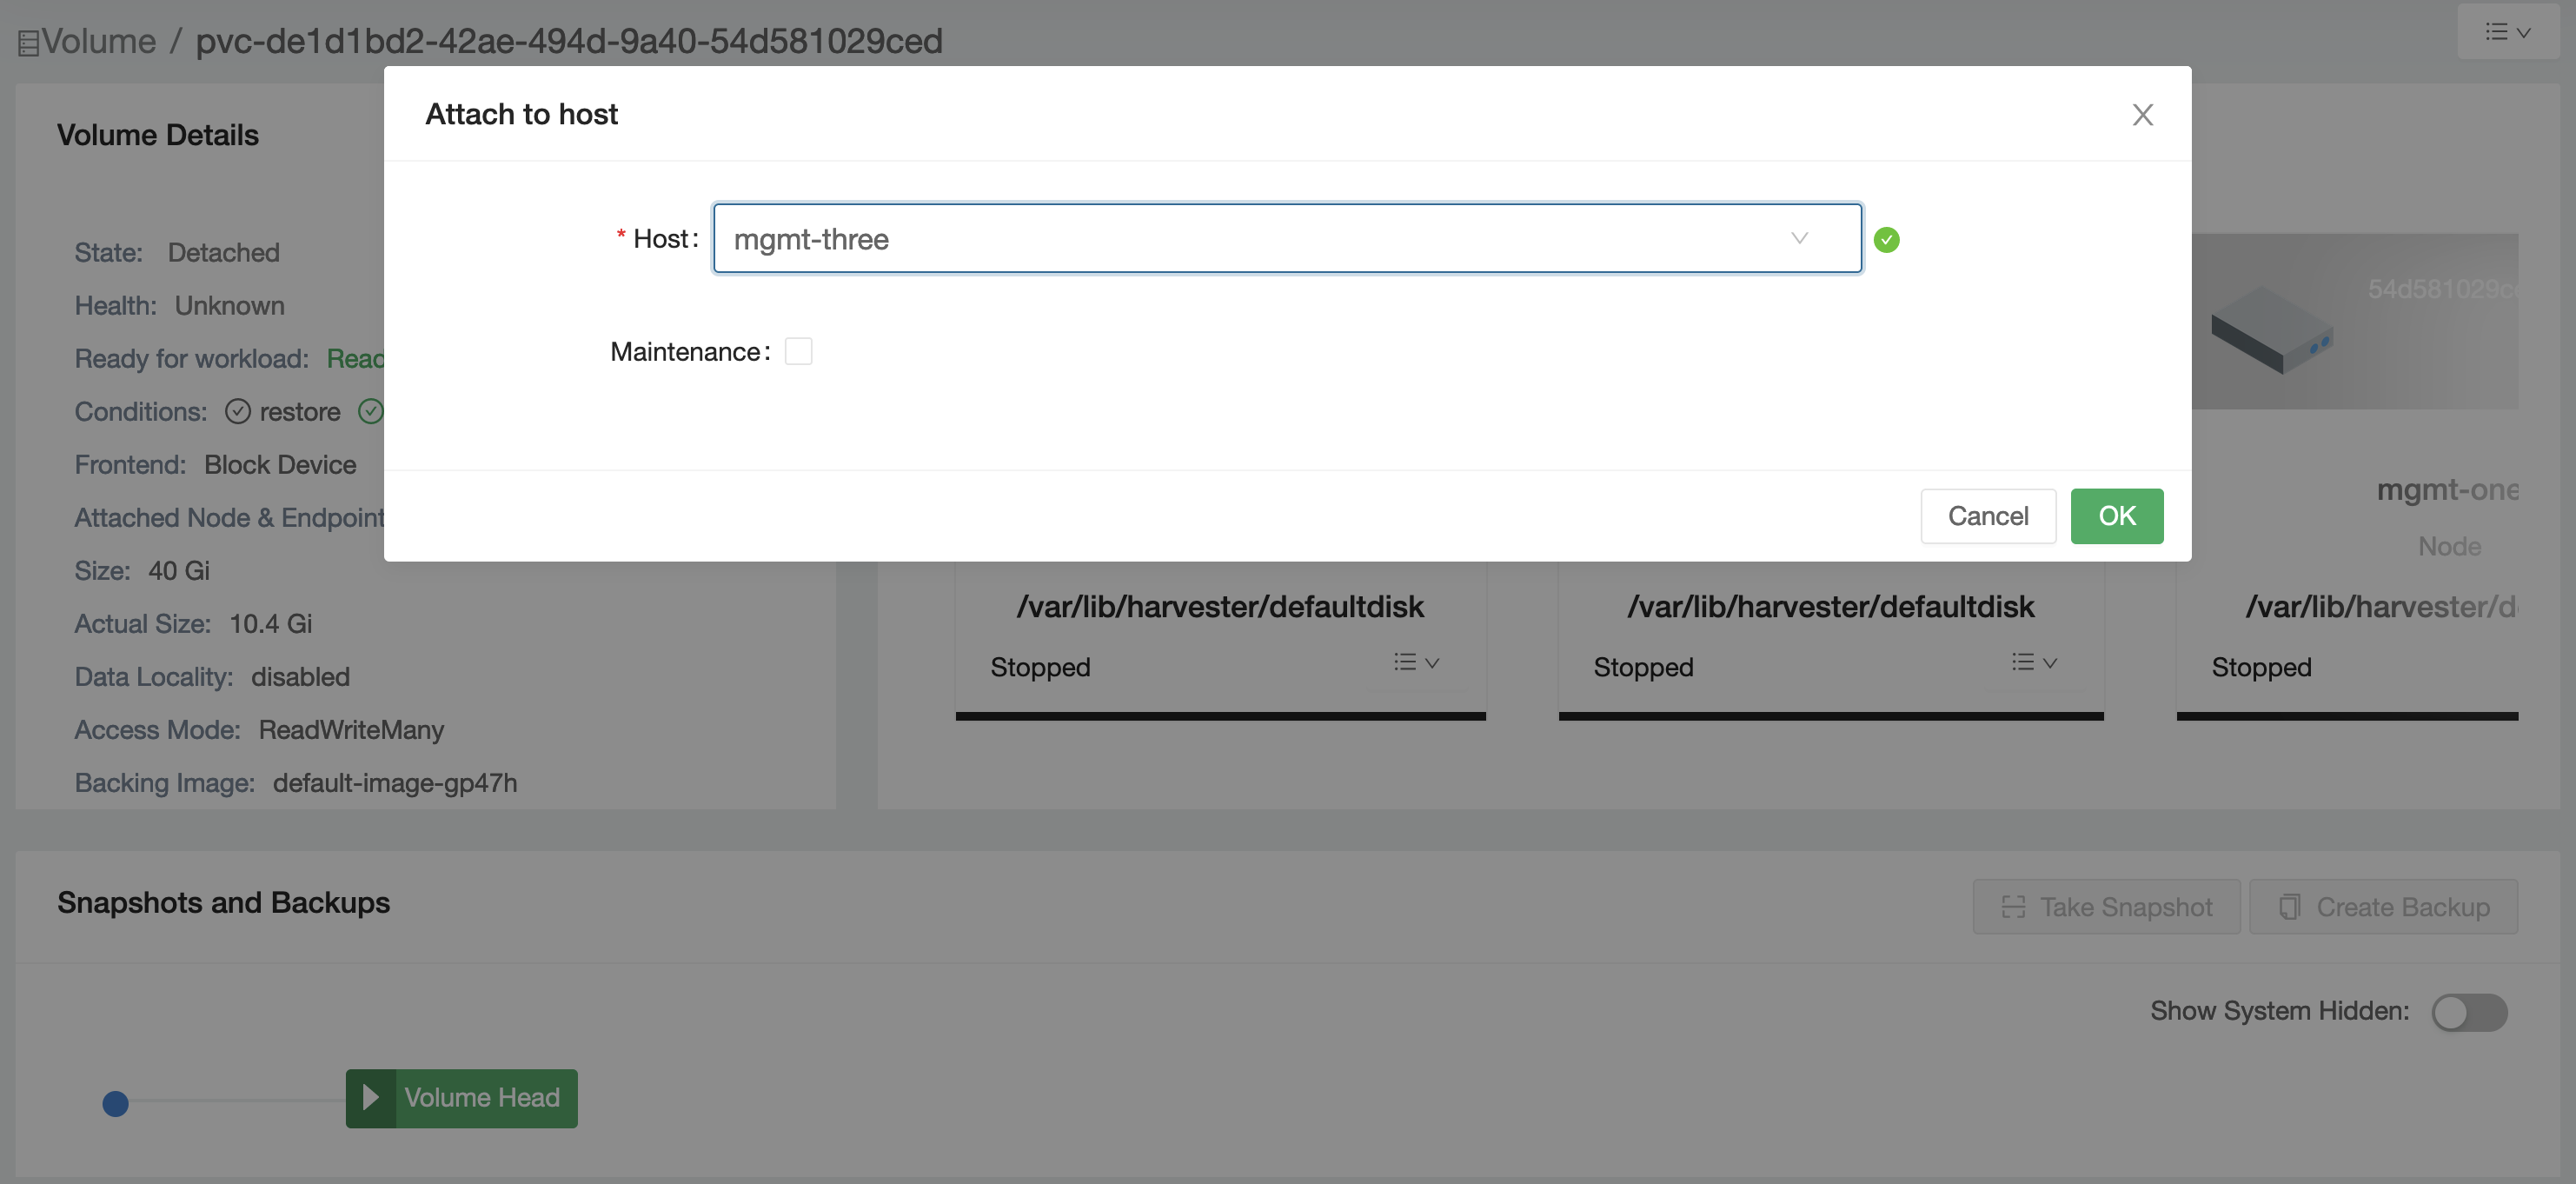
  • Select the attached node.

choose the attached node

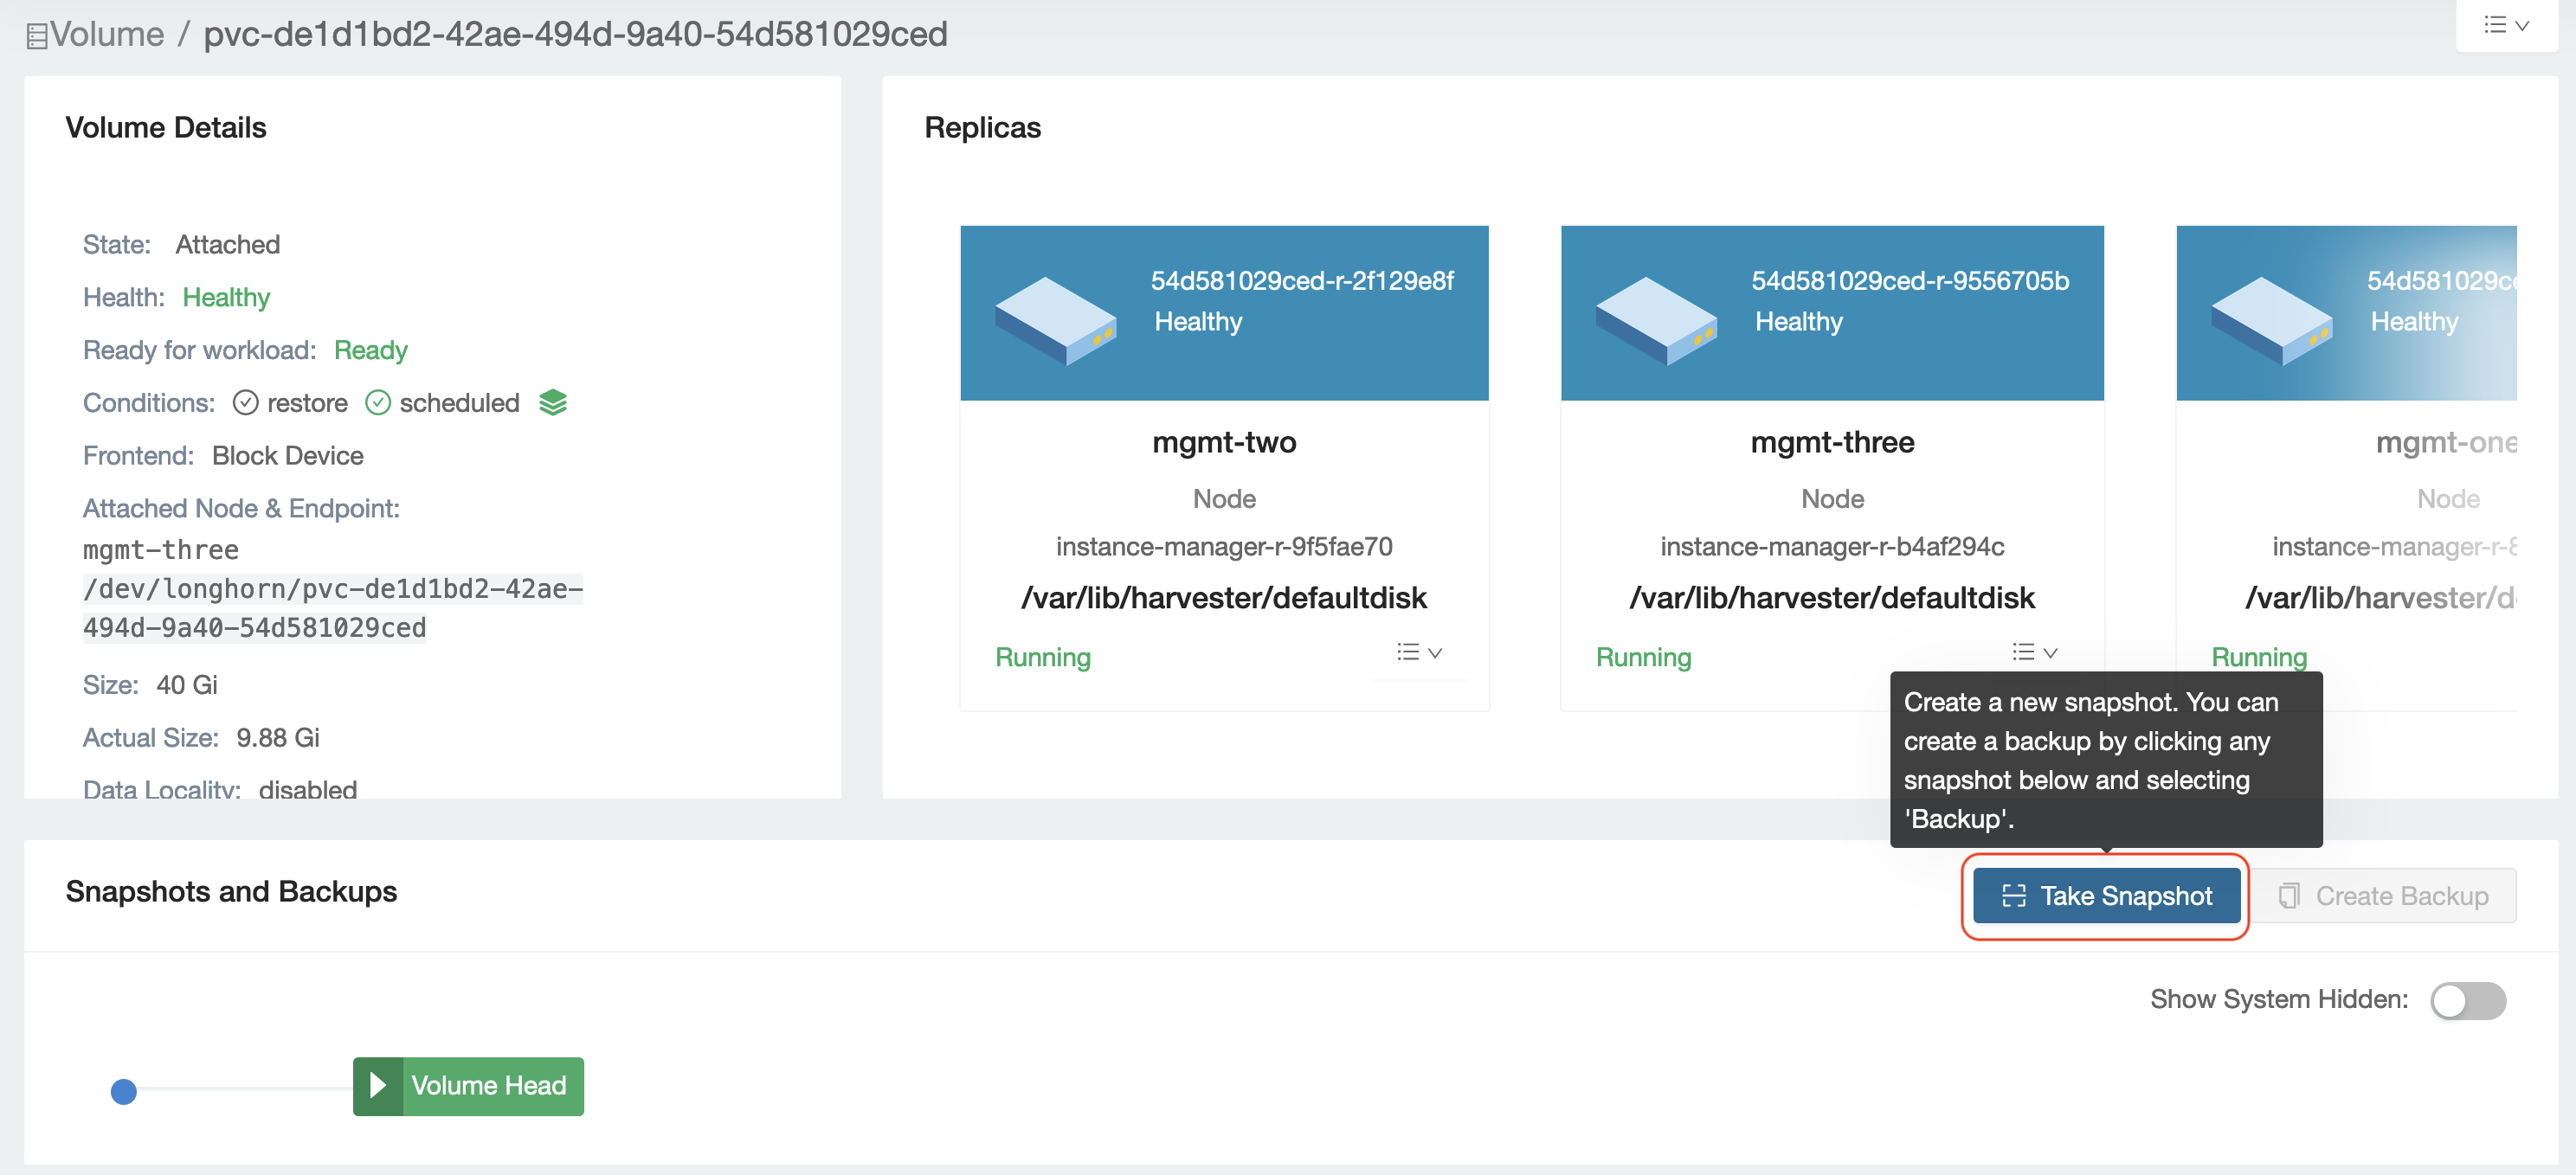
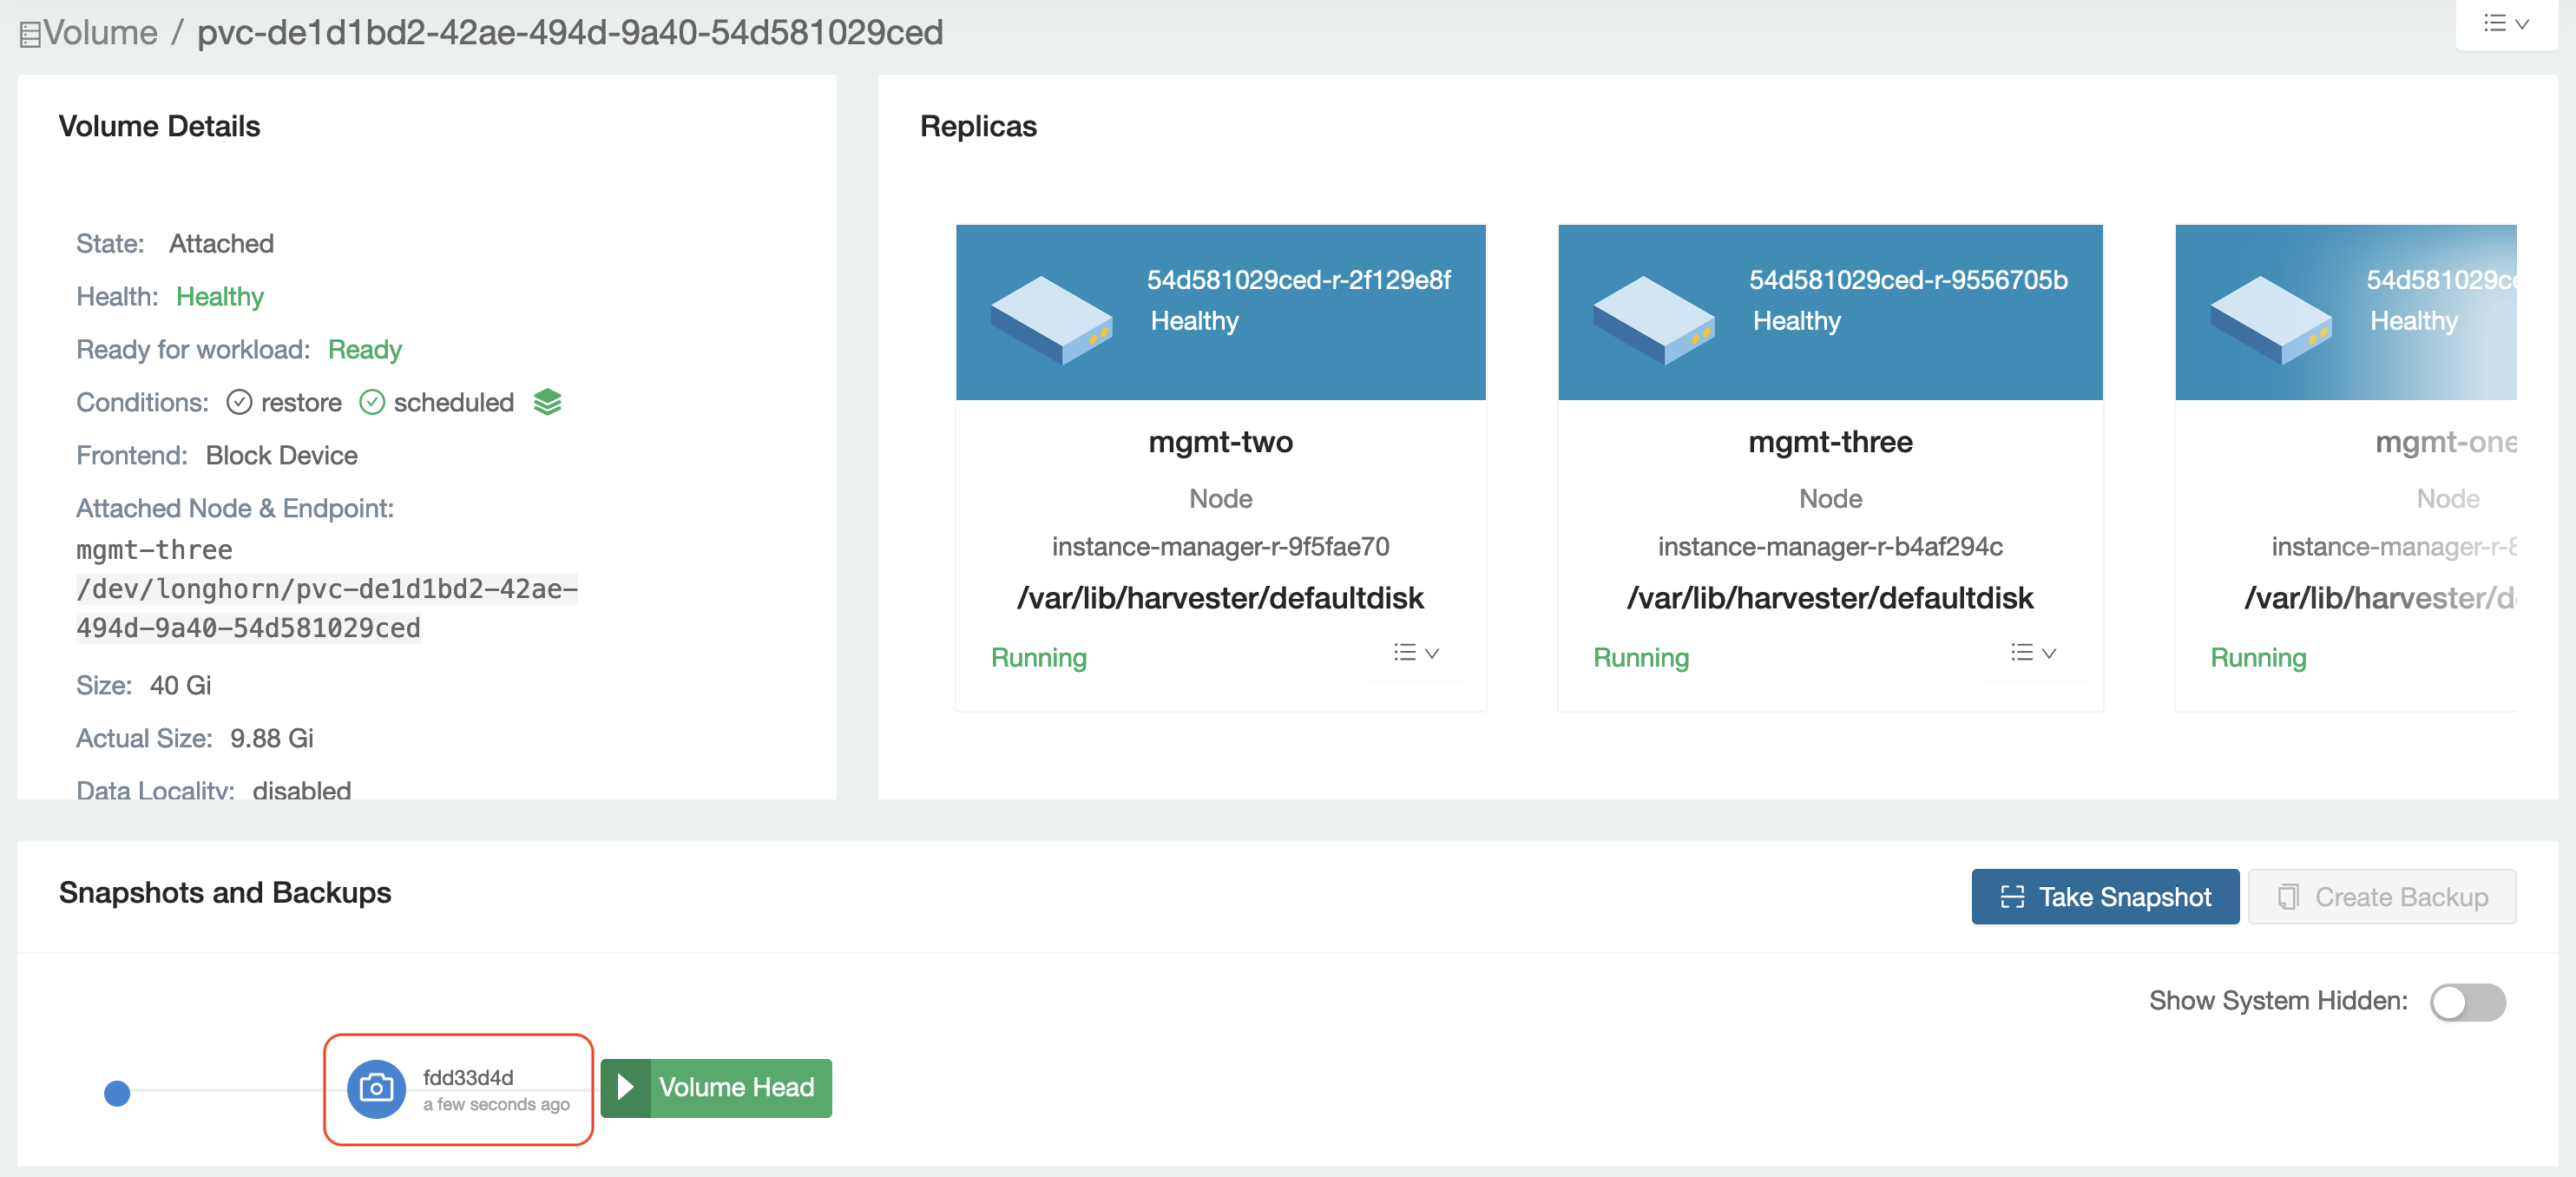
  • Check the volume attached under Volume Details and select Take Snapshot on this volume page.

take snapshot on volume page

  • Confirm that the snapshot is ready.

check the snapshot is ready

Now that you completed the volume backup, you need to scan and repair the root filesystem.

Scanning the root filesystem and repairing

This section will introduce how to scan the filesystem (e.g., XFS, EXT4) using related tools.

Before scanning, you need to know the filesystem's device/partition.

  • Identify the filesystem's device by checking the major and minor numbers of that device.
  1. Obtain the major and minor numbers from the listed volume information.

    In the following example, the volume name is pvc-ea7536c0-301f-479e-b2a2-e40ddc864b58.

    harvester-node-0:~ # ls /dev/longhorn/pvc-ea7536c0-301f-479e-b2a2-e40ddc864b58 -al
    brw-rw---- 1 root root 8, 0 Oct 23 14:43 /dev/longhorn/pvc-ea7536c0-301f-479e-b2a2-e40ddc864b58

    The output indicates that the major and minor numbers are 8:0.

  2. Obtain the device name from the output of the lsblk command.

    harvester-node-0:~ # lsblk
    NAME MAJ:MIN RM SIZE RO TYPE MOUNTPOINTS
    loop0 7:0 0 3G 1 loop /
    sda 8:0 0 40G 0 disk
    ├─sda1 8:1 0 2M 0 part
    ├─sda2 8:2 0 20M 0 part
    └─sda3 8:3 0 40G 0 part

    The output indicates that 8:0 are the major and minor numbers of the device named sda. Therefore, /dev/sda is related to the volume named pvc-ea7536c0-301f-479e-b2a2-e40ddc864b58.

  • You should now know the filesystem's partition. In the example below, sda3 is the filesystem's partition.
  • Use the Filesystem toolbox image to scan and repair.
# docker run -it --rm --privileged registry.opensuse.org/isv/rancher/harvester/toolbox/main/fs-toolbox:latest -- bash

Then we try to scan with this target device.

XFS

When scanning an XFS filesystem, use the xfs_repair command and specify the problematic partition of the device.

In the following example, /dev/sda3 is the problematic partition.

# xfs_repair -n /dev/sda3

To repair the corrupted partition, run the following command.

# xfs_repair /dev/sda3

EXT4

When scanning a EXT4 filesystem, use the e2fsck command as follows, where the /dev/sde1 is the problematic partition of the device.

# e2fsck -f /dev/sde1

To repair the corrupted partition, run the following command.

# e2fsck -fp /dev/sde1

After using the 'e2fsck' command, you should also see logs related to scanning and repairing the partition. Scanning and repairing the corrupted partition is successful if there are no errors in these logs.

Detach and Start VM again.

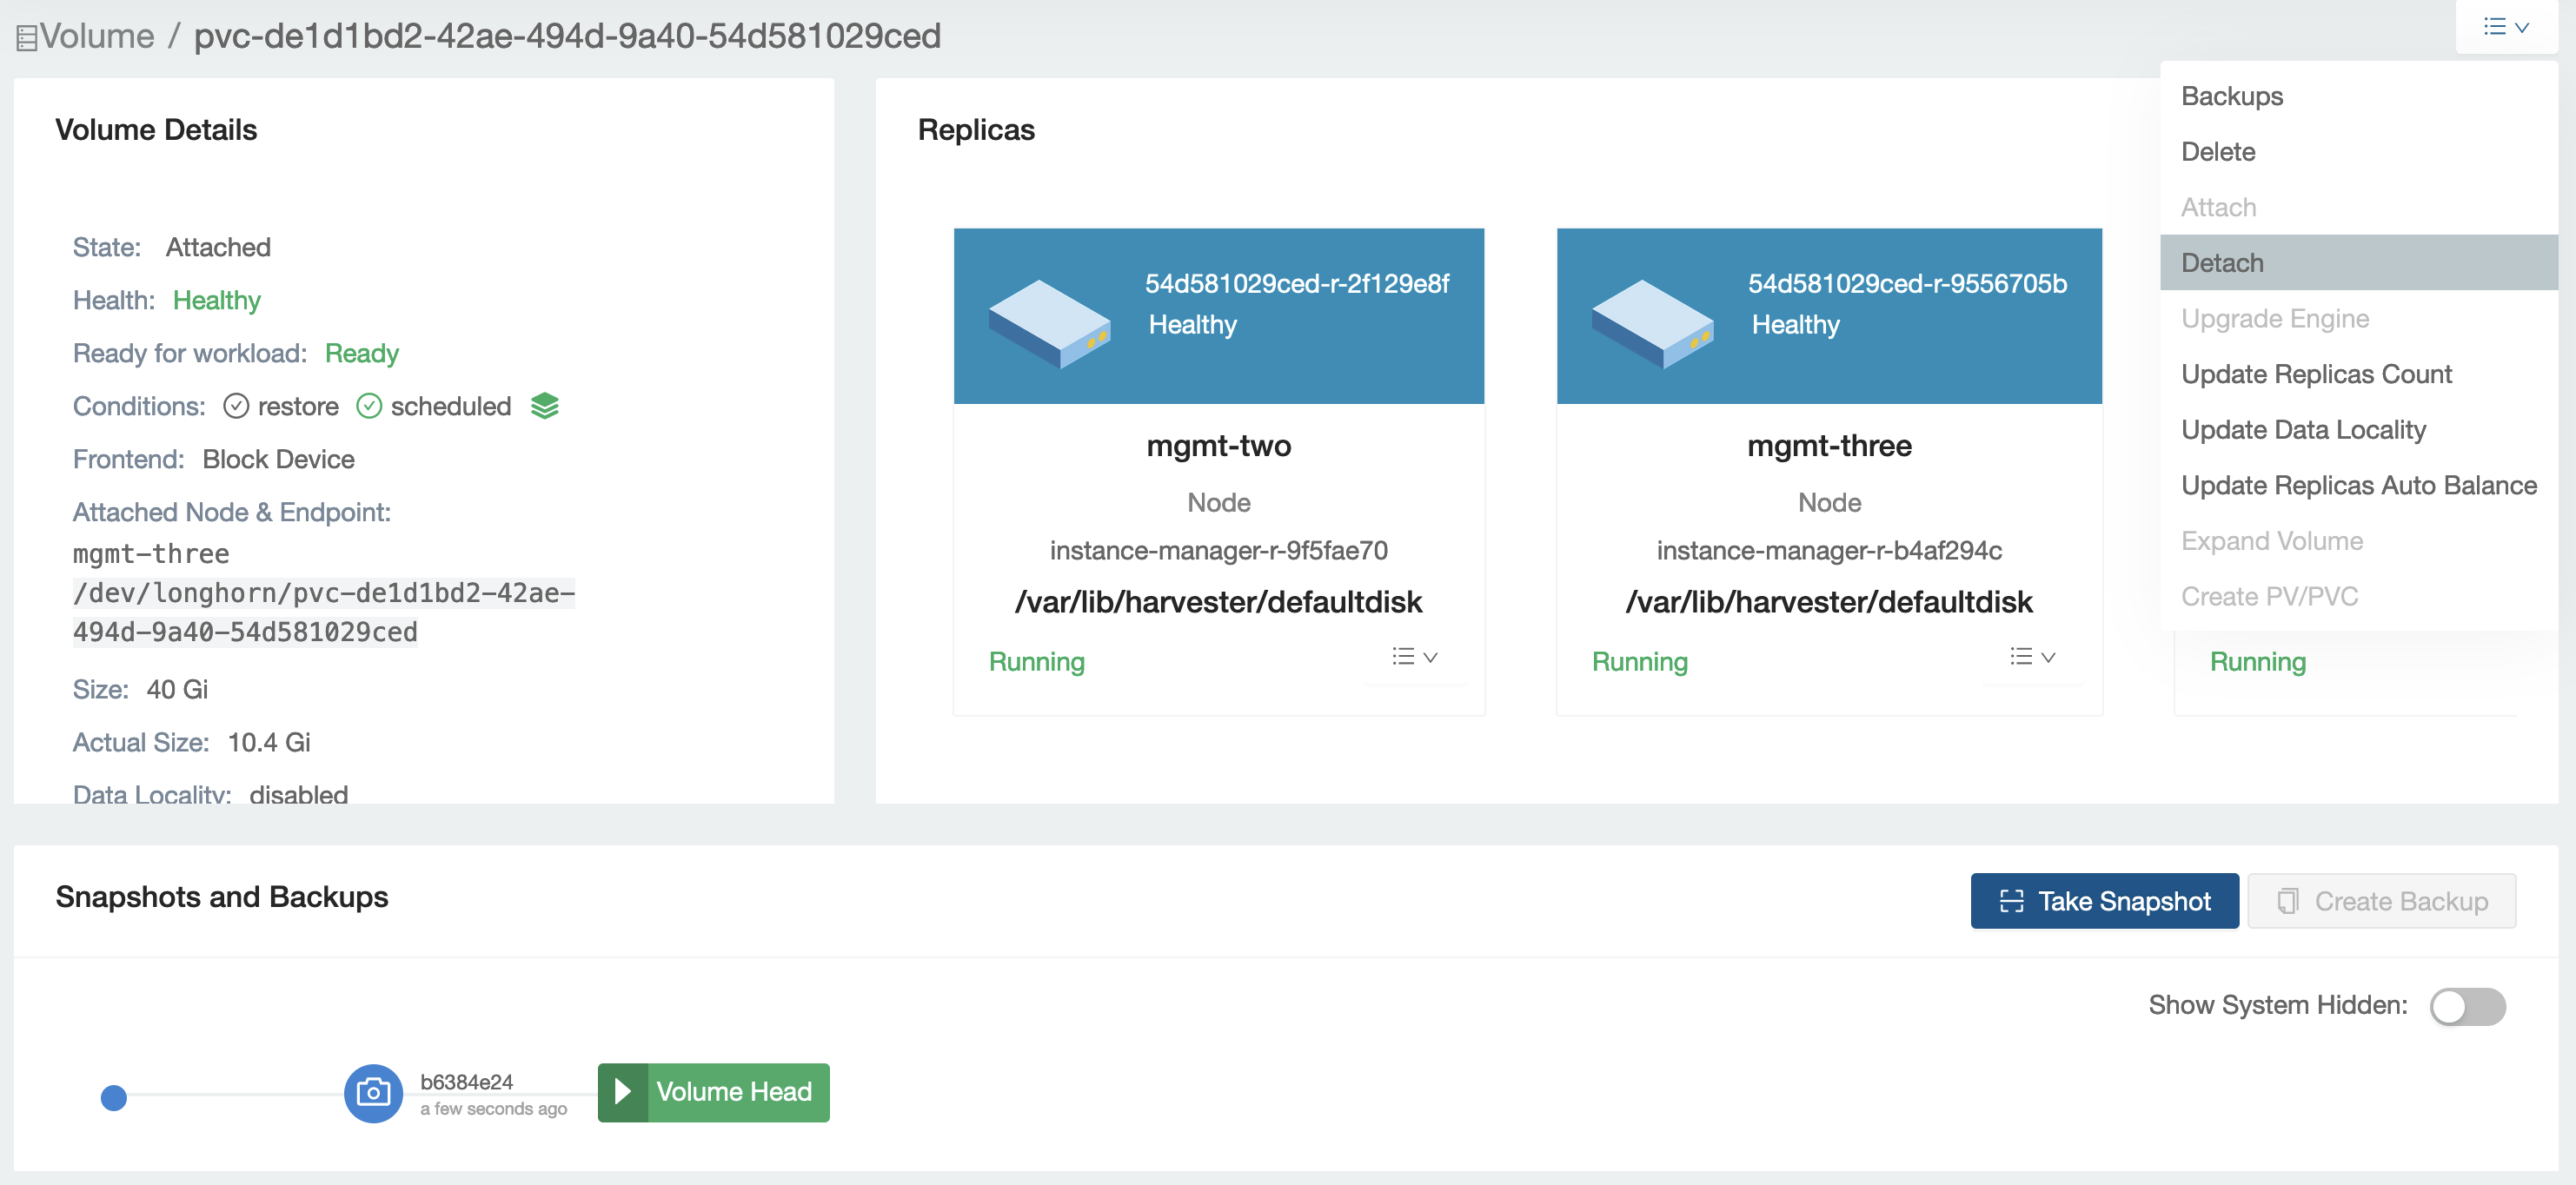
After the corrupted partition is scanned and repaired, detach the volume and try to start the related VM again.

  • Detach the volume from the Longhorn UI.

detach volume on longhorn UI

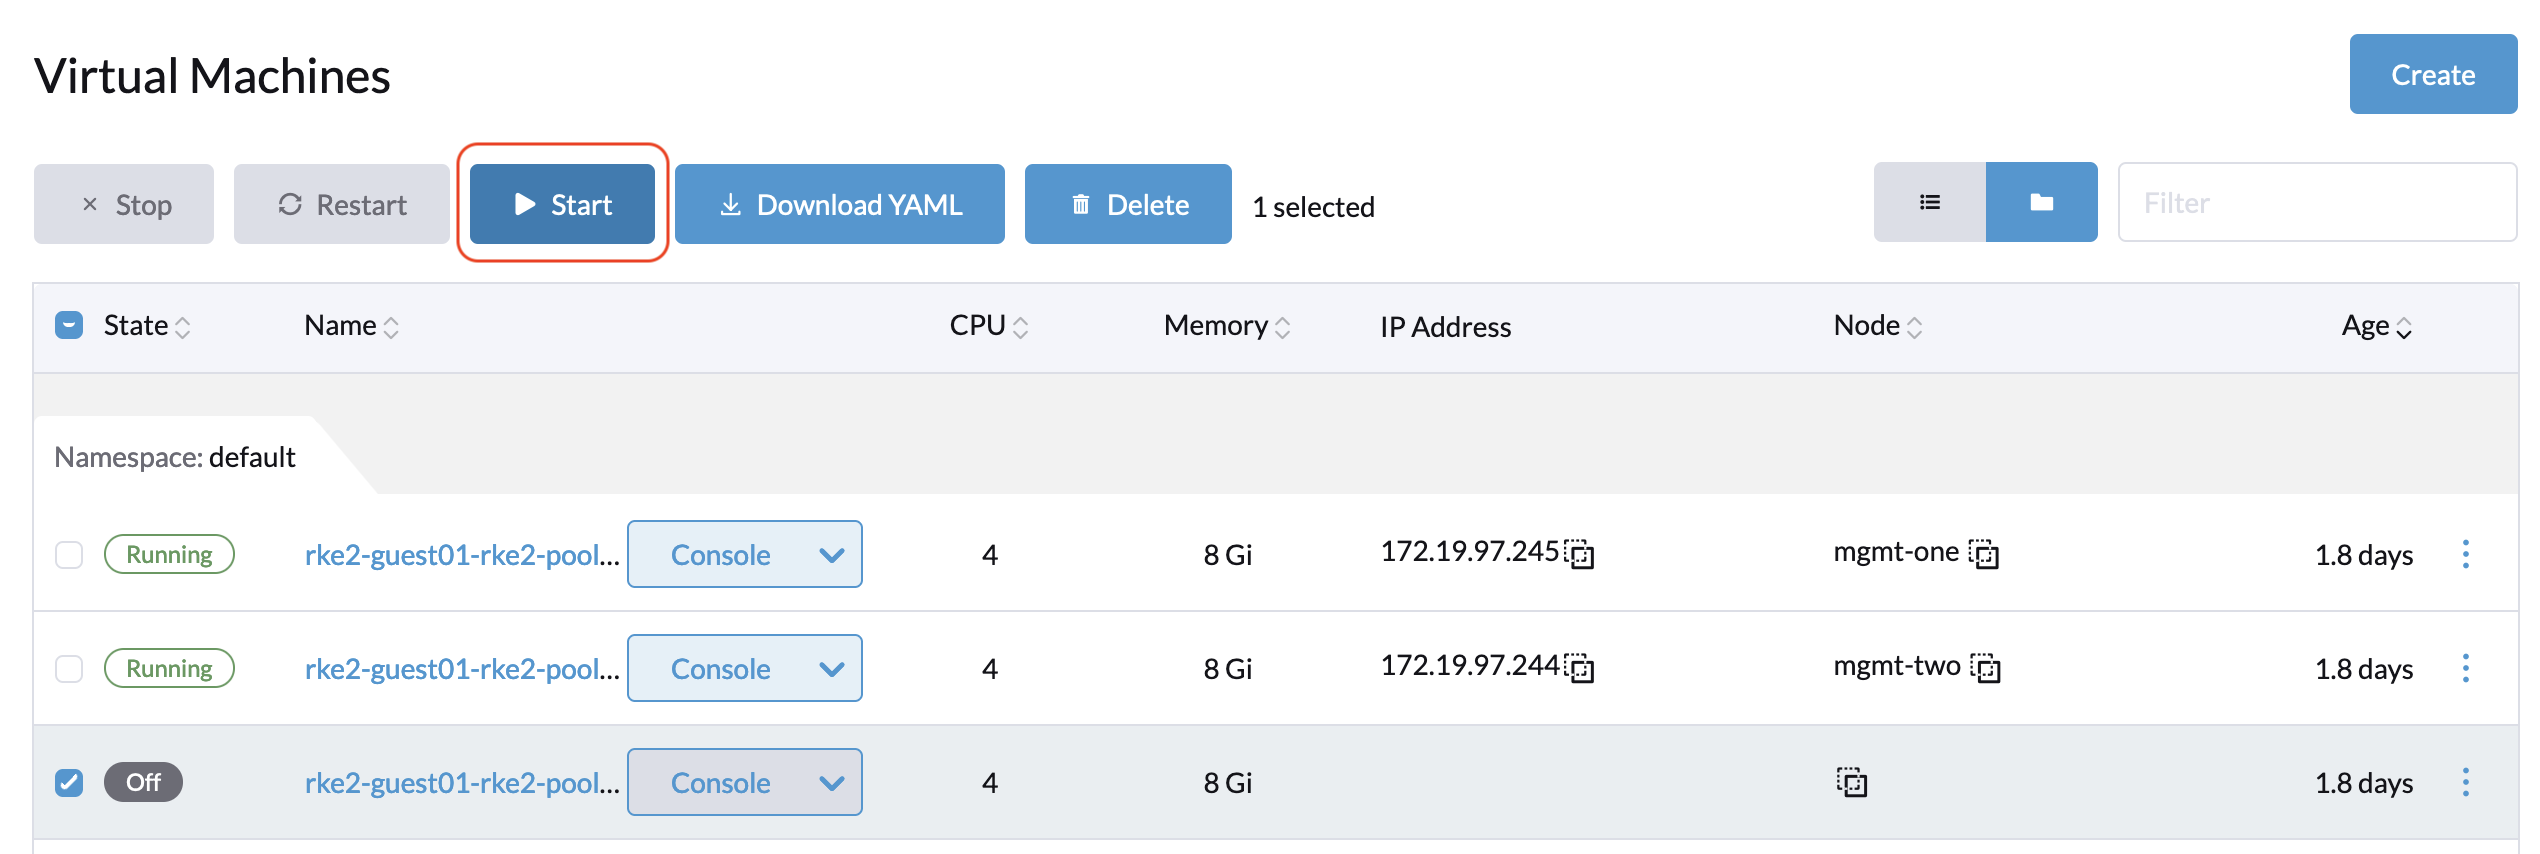
  • Start the related VM again from the Harvester UI.

Start VM again

Your VM should now work normally.

· 2 min read
Kiefer Chang

Harvester replicates volumes data across disks in a cluster. Before removing a disk, the user needs to evict replicas on the disk to other disks to preserve the volumes' configured availability. For more information about eviction in Longhorn, please check Evicting Replicas on Disabled Disks or Nodes.

Preparation

This document describes how to evict Longhorn disks using the kubectl command. Before that, users must ensure the environment is set up correctly. There are two recommended ways to do this:

  1. Log in to any management node and switch to root (sudo -i).
  2. Download Kubeconfig file and use it locally
    • Install kubectl and yq program manually.
    • Open Harvester GUI, click support at the bottom left of the page and click Download KubeConfig to download the Kubeconfig file.
    • Set the Kubeconfig file's path to KUBECONFIG environment variable. For example, export KUBECONFIG=/path/to/kubeconfig.

Evicting replicas from a disk

  1. List Longhorn nodes (names are identical to Kubernetes nodes):

    kubectl get -n longhorn-system nodes.longhorn.io

    Sample output:

    NAME    READY   ALLOWSCHEDULING   SCHEDULABLE   AGE
    node1 True true True 24d
    node2 True true True 24d
    node3 True true True 24d
  2. List disks on a node. Assume we want to evict replicas of a disk on node1:

    kubectl get -n longhorn-system nodes.longhorn.io node1 -o yaml | yq e '.spec.disks'

    Sample output:

    default-disk-ed7af10f5b8356be:
    allowScheduling: true
    evictionRequested: false
    path: /var/lib/harvester/defaultdisk
    storageReserved: 36900254515
    tags: []
  3. Assume disk default-disk-ed7af10f5b8356be is the target we want to evict replicas out of.

    Edit the node:

    kubectl edit -n longhorn-system nodes.longhorn.io node1 

    Update these two fields and save:

    • spec.disks.<disk_name>.allowScheduling to false
    • spec.disks.<disk_name>.evictionRequested to true

    Sample editing:

    default-disk-ed7af10f5b8356be:
    allowScheduling: false
    evictionRequested: true
    path: /var/lib/harvester/defaultdisk
    storageReserved: 36900254515
    tags: []
  4. Wait for all replicas on the disk to be evicted.

    Get current scheduled replicas on the disk:

    kubectl get -n longhorn-system nodes.longhorn.io node1 -o yaml | yq e '.status.diskStatus.default-disk-ed7af10f5b8356be.scheduledReplica'

    Sample output:

    pvc-86d3d212-d674-4c64-b69b-4a2eb1df2272-r-7b422db7: 5368709120
    pvc-b06f0b09-f30c-4936-8a2a-425b993dd6cb-r-bb0fa6b3: 2147483648
    pvc-b844bcc6-3b06-4367-a136-3909251cb560-r-08d1ab3c: 53687091200
    pvc-ea6e0dff-f446-4a38-916a-b3bea522f51c-r-193ca5c6: 10737418240

    Run the command repeatedly, and the output should eventually become an empty map:

    {}

    This means Longhorn evicts replicas on the disk to other disks.

    note

    If a replica always stays in a disk, please open the Longhorn GUI and check if there is free space on other disks.